


Instead of stamping the flowers one on top of another, I wanted to use the "Masking Technique" to give the card a more dimensional look.
To make today's card, I punched the flower on a piece of scrap cardstock, cut it out, and used it as my "Mask". Now I had my template ready to go. Next I took a piece of 5 x 9 Whisper White cardstock, folded it in half and ran it through my Big Shot using the Scallop Circle Big Die. Because I wanted this to be my card base, when laying the folded piece of paper on my die I left the top four scallops exposed before cutting so I would have the crease at the top where my card would fold. Using Tempting Turquoise and Pear Pizzazz Ink, I alternated stamping the flower. If you look at the top right corner of the card you will see the full flower stamped in Pear Pizzazz. I then used my "Mask" and laid it over that flower so when I stamped the next flower in Tempting Turquoise it gives it a layered look. I kept doing this all the way around
until I reached the beginning (the first flower stamped in Pear Pizzazz).
First stamped image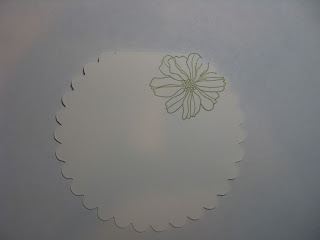

My mask, layered on top of the first stamped flower.

 The "Mask" keeps the ink from stamping on top of the first flower.
To make today's card I used the following:
Cardstock: Whisper White #100730
Ink: Tempting Turquoise #100814, Pear Pizzazz #119784
Stamp Set: Fifth Avenue Floral #113734, Occasional Quotes #117048 wood mount or #120142 clear mount (Level 3 Hostess)
Accessories: Big Shot Die Cut Machine #113439, Scallop Circle Bigz Die #113468
My Stamping Timesaver: I save all of my "Mask" templates with the stamp set I used to create it. When I want to repeat the technique I already have my template on hand. I also use a darker color of cardstock for my "Mask" so it stands out when I lay it on top of the first stamped image.


No comments:
Post a Comment