Wednesday, December 25, 2013

Merry Christmas!

I want to wish all of my readers a very Merry Christmas and Happy New Year.  It has been a year full of sharing our creative ideas and learning and growing from one another.  I hope you all have a wonderful day with friends and family, and I plan on spending the next few days cherishing time spent with mine.  I am taking a week off from posting to my blog as I just relax and enjoy these last days of 2013.  I look forward to coming back in 2014 and sharing project and ideas from the new Occasions Catalog.  See you in January!


And my last post of the year sends a very Merry Christmas to you!


Come back in 2014 to get instructions on how to make this fun treat using the Envelope Punch Board.

Thank you to all of the Stampin' Up! Demonstrators who have shared their creativity with me through a  demonstrator only site called Stampin' Connections.  I have been very inspired and a lot of my projects posted have come from your inspiration.  

Monday, December 23, 2013

Lots of Thanks


I love when a stamp set and punch coordinate making it easy for you to put your card together in a snap.  No cutting involved!

My card base is Cherry Cobbler Card Stock with a layer of Crumb Cake and Whisper White.  To that I added some Daffodil Delight, Crumb Cake, and Cherry Cobbler 1/2" Seam Binding and then my stamped and punched mosaics which I placed on with Dimensionals .  Next I added my Thank You sentiment and I have my finished card.  


The following were used:
Card Stock:  Cherry Cobbler #119685, Crumb Cake #120953, Daffodil Delight #119683
Ink:  Cherry Cobbler #126966, Crumb Cake #126975, Daffodil Delight #126944
Stamp Sets:  Lots of Thanks #129687 w or #129690 c, Mosaic Madness #130246 w or #130249 c
Ribbon:   1/2" Seam Binding - Daffodil Delight #125583, Crumb Cake #122332, Cherry Cobbler #120992
Punch:  Mosaic #131267
Adhesive:  Dimensionals #104430, Snail #104332

Friday, December 20, 2013

One Layer - By The Tide

I don't think you always need a lot of layers to make your card special.  Sometimes just doing a simple technique, like heat embossing, and your card can stand out all on its own.  

I wanted a dark card base to make my embossing really pop, so I went with Chocolate Chip Card Stock.  I stamped my coral with Versa Mark Ink, sprinkled it with Wild Wasabi Embossing Powder and then set it using my Heat Tool.    I layered my Thank You which is on Whisper White Card Stock onto a piece of Wild Wasabi to once again add the contrast.

Tip:  It really is important to use your Embossing Buddy on your Card Stock before you start to stamp.  Just rub it across your paper to help prevent any extra powder from getting in areas you don't want embossed.  

The following were used:
Card Stock:  Chocolate Chip #102128, Whisper White #100730, Wild Wasabi #108641
Ink: Versa Mark #102283
Stamp Sets:  By The Tide #131910 w or #129120 c, Simply Sketched #129669 w or #129672 c (Hostess)
Tools:  Heat Tool #129053, Embossing Buddy #103083      Embossing Powder:  Wild Wasabi #123224
Punches:  Large Oval #119855, Scallop Oval #119856

Wednesday, December 18, 2013

Evergreen Birthday Card

The Evergreen Stamp Set which is a carryover set from last year's Holiday Catalog, was the set I used last year for my Christmas Cards.  But, as you can see, it also makes a nice birthday card for those celebrating during the winter season.

My card base is Always Artichoke Card Stock that I embossed with the Northern Flurry Embossing Folder.  My Evergreen Tree was stamped with Always Artichoke Ink onto a piece of Very Vanilla Card Stock and then cut with my Big Shot and an Apothecary Accent Framelit.  Before I placed this onto my card I attached a piece of Season of Style Washi Tape to my card base.  I placed my image onto my card using dimensionals and added some Rhinestones for a little extra bling!  I stamped my birthday and cut this out with a Bitty Banner Framelit, and accented it with some Always Artichoke Ink along the edges.

The following were used:
Card Stock:  Always Artichoke #105119, Very Vanilla #101650
Stamp Sets:  Evergreen #127970 w or #127973 c (Holiday Carryover Set from 2012), From My Heart #132007 w or #126557 c
Ink:  Always Artichoke #126972
Tools:  Big Shot #113439, Northern Flurry Embossing Folder #120902, Apothecary Accents Framelits #127003, Bitty Banners Framelits #129267
Accessories:  Season of Style Washi Tape #132144, Rhinestones #119246
Adhesive:  Dimensionals #104430, Snail #104332

Monday, December 16, 2013

Deco Label Framelits

Framelits make it easy to cut out a design anywhere on your project.  I like stamping my image on my card base and then cutting a Framelit around it to make it stand out.

My card base of Crumb Cake Card Stock was stamped with an image from the Serene Silhouettes Stamp Set.  Next I layered a piece of Basic Black Card Stock and Modern Medley Designer Paper together and cut a Deco Label Framelit to create the opening for my image.  I then tied on a piece of Crumb Cake 3/8" Taffeta Ribbon and added my Birthday Wishes.  

To know where to place your Framelit so it shows the image stamped below I mark my layer with pencil markings by measuring how far in the image is on my card base.  

The following were used:
Card Stock: Crumb Cake #120953, Basic Black #121045
Designer Series Paper: Modern Medley #126926
Ink: Crumb Cake #126975
Stamp Set: Serene Silhousettes #132073 w or #127324 c, Petite Pairs #128706 w or #122497 c
Ribbon: Crumb Cake 3/8" Taffeta #122966
Tools: Big Shot #113439, Deco Labels Framelits #130102
Punch:  Large Oval #119855
 

Friday, December 13, 2013

Wish Big


Well the meaning of the sentiment sends big wishes, but the size of the small stamp fits perfectly inside my cut out  framelit.  

My card base is Very Vanilla Card Stock that I layered with a piece of Baked Brown Sugar and Venetian Romance Designer Paper.  Before I put the two layers together I cut a banner out of my Designer Paper using a Hearts a Flutter Framelit.  Now I was left with a nice opening where I placed my sentiment which was stamped on Very Vanilla Card Stock and cut out with a Bitty Banner Framelit, and then trimmed at the end to fit.  

I wrapped some Linen Thread around these two layers, added some Candy Dots for some fun and the card is finished. 

The following were used:
Card Stock:  Very Vanilla101650, Baked Brown Sugar #131296
Designer Series Paper:  Venetian Romance #130144
Ink:  Tangerine Tango #126946
Stamp Set:  A Dozen Thoughts #131056 w or #131059 c
Tools:  Big Shot #113439, Hearts a Flutter Framelits #130159, Bitty Banner Framelits #129267
Ribbon:  Linen Thread #104199
Embellishment:  Bright Candy Dots #130931, Neutral Candy Dots #130934

Thursday, December 12, 2013

Floral Frames Christmas Card

I usually use the Floral Frames Collection Framelits for summer cards, but the designs can really be used for any occasion.  Just change your colors to match your occasion and you have a very versatile Framelit.

 My card base is Cherry Cobbler Card Stock that I embossed with the Petals-a-Plenty Embossing Folder.  I then stamped my two medallions, the larger one with Cherry Cobbler, and the smaller one with Garden Green.  I cut them out with the Framelit, and also cut the center of each one with a Circle Framelit.  I placed the Garden Green Medallion onto the larger one using Dimensionals, and then added my Very Merry which was punched out with the 7/8"  Scallop Circle Punch.  Another 1 1/4" Scallop Circle in Garden Green was added for more dimension and color. 

The following were used:
Card Stock:  Cherry Cobbler #119685, Garden Green #102584, Whisper White #100730
Ink:  Cherry Cobbler #126966, Garden Green #126973
Stamp Sets: Daydream Medallions #131976 w or #126467 c, Very Merry Tags #130393 w or #130402 c
Tools:  Big Shot #113439, Floral Frames Framelits #127012, Petals-a-Plenty Embossing Folder #116824, Circles Collection Framelits #130911
Punches:  7/8" Scallop Circle #129404, 1 1/4" Scallop Circle #127811
Adhesive:  Dimensionals #104430

Wednesday, December 11, 2013

Top Note Gift Card Holder


First picture, front of Gift Card and below - back of card with opened slot for placement of card.


To make the gift card I cut a piece of Cherry Cobbler Card Stock with my Big Shot and the Top Note Bigz Die.     I then cut another Top Note Die with a piece of Season of Style Designer Series Paper.  Since you only need half of the cut Die you can save the other half for another gift card.  To adhere this to the Cherry Cobbler Top Note, I placed Sticky Strip around the two sides and the bottom.  Make sure you put no adhesive on the top, because this is the slot to place your gift card.

I decorated the front using two stamp sets -  Festive Flurry from the Holiday Catalog, and Sassy Salutations from the Annual Catalog.  I stamped my images using White Craft Ink.  I let it dry for a few minutes and then placed my Cherry Cobbler Baker's Twine onto the top using a Brights Glimmer Brad to keep it in place.

I have seen a lot of this type of Gift Card made, and this is not my original idea but I was inspired by all those I have seen.

The following were used:
Card Stock:  Cherry Cobbler #119685
Designer Series Paper: Season of Style #132340
Ink:  Whisper White Craft #101731
Stamp Sets:  Festive Flurry #131778 w or #131781 c, Sassy Salutations #132070 w or #126707 c
Ribbon:  Cherry Cobbler Baker's Twine #123125
Tools:  Big Shot #113439, Top Note Bigz Die #113463
Embellishment:  Bright 3/8" Glimmer Brads #121006
Adhesive:  Sticky Strip #104294


Monday, December 9, 2013

Another Washi BirthdayEpi

Epic Day This and That Washi

Washi Tape Refrigerator Magnet


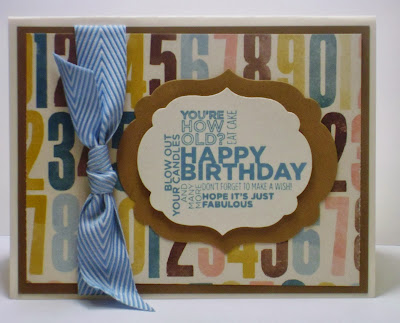
This is another card the ladies will be making at the Washi Tape Class.  To go with this card, for a little something extra, a refrigerator magnet.

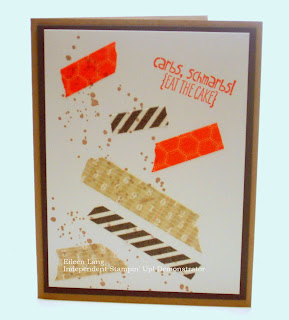
My card base is Crumb Cake Card Stock with a layer of Basic Gray and Whisper White.  To the Whisper White layer I added  torn pieces of the tape, and then my stamped images.  Another really easy card to make, and you could place your tape in any random pattern, or cut your pieces if you want a more uniform look.  

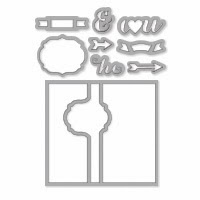
The refrigerator magnet was made by adding a piece of the tape and trimming it to fit.  Since the tape already has the adhesive right on it, there was no need to add any more.  I placed a magnetic strip on the back, and to embellish the front I tied on a piece of Whisper White Baker's Twine, a Very Vintage Designer Button and my small love sentiment from the Lovely Little Labels Stamp Set.

The following were used:
Card Stock:  Crumb Cake #120953, Basic Gray #121044, Whisper White #100730
Ink: Crumb Cake #126975, Calypso Coral #126983
Stamp Set: Yippee-Skippee #131341 w or #131344 c, Lovely Little Labels #132033 w or #126262 c
Accessories:  Epic Day This and That Washi Tape #131269, Very Vintage Designer Buttons #129327
Ribbon:  Whisper White Baker's Twine #124262
Punch:  Little Labels Punch Pack #126881

Friday, December 6, 2013

Happy Birthday Washi Style

After the holidays I will be doing a Washi Class and have started to design some of the cards.  Washi Tape is so easy to use and each pack comes with three designs that you can use together, or design with just one or two.

My card base is Whisper White Card Stock with a layer of Melon Mambo, and then another layer of Whisper White.  Before I put the layer of Whisper White onto my card I wrapped my Washi Tape around the back.  You could just cut it at the end, but I like to wrap it around.  I then stamped the additional image, what I call rain drops,  at the top, added a pearl to the bottom drop for a bit more embellishment, and then added my Happy Birthday to the center.  This was punched out with the Artisan Label punch and placed onto my card using Dimensionals.


The following were used:
Card Stock: Whisper White #100730, Melon Mambo #115320
Embelishment:  Gingham Garden Designer Washi Tape #129314, Pearl Basic Jewels #125577
Ink: Melon Mambo #126948
Stamp Sets:  My Friend #128670 w or #122587 c, Label Love #130619 w or #130622 c
Punch:  Artisan Label #130920
Adhesive:  Dimensionals #104430

Thursday, December 5, 2013

Nautical Birthday Card

I thought the pattern in the Venetian Romance Designer Series Paper went well with my nautical birthday card, and it was a nice chance to use my new Photopolymer Stamp Set called Settin' Sail.

My card base is Pistachio Pudding Card Stock with a layer of Island Indigo and Venetian Romance Designer Paper.  I stamped my images and punched them out and then placed them onto my card in random order.  I also placed a cut piece of 1 1/4" Burlap Ribbon to give it a bit more texture. 

You can see all of the Photopolymer Stamp Sets by going to my online store here.  It is easy to   forget about items not in the Annual or Holiday Catalog, and Stampin' Up! has come out with so many new items this year, so the online store is the place to go to see it all.

The following were used:
Card Stock: Pistachio Pudding #131294, Island Indigo #122923, Very Vanilla #101650
Designer Series Paper:  Venetian Romance #130144
Ink:  Island Indigo #126986, Soft Suede #126978
Stamp Set:  Settin' Sail #133453 c (Photopolymer)
Ribbon:  1 1/4" Burlap #132140 (Holiday Catalog)
Punches:  Hexagon #130919, 1 1/4" Circle #119861

Wednesday, December 4, 2013

You're How Old?


I like the large birthday sentiment from the Delightful Dozen Stamp Set.  It makes a great statement, and layers nicely with the Labels Collection Framelits.  Pair it with some Soho Subway Designer Series Paper and it is a perfect fit.

My card base is Very Vanilla Card Stock, with a layer of Baked Brown Sugar, and a piece of  Soho Subway Designer Paper.  I stamped my sentiment with Marina Mist Ink, cut it out with a Label Framelit, and layered this onto another Framelit that was cut with more Baked Brown Sugar Card Stock.  To finish the card I tied a piece of Marina Mist 3/4" Chevron Ribbon to the left side.  

The Delightful Dozen Stamp Set, like its name implies, has great sentiments for 12 different occasions.

The following were used:
Card Stock: Very Vanilla #101650, Baked Brown Sugar #131296
Designer Series Paper:  Soho Subway #130140
Ink: Marina Mist #126962
Stamp Set:  Delightful Dozen #128547 w or #122652 c
Ribbon:  Marina Mist 3/4" Chevron


Friday, November 29, 2013

Sympathy Card


Using Core'dinations Card Stock, an embossing folder, and a sanding block creates a soft background for your card.  Core'dinations Card Stock can be purchased in all of the color families and gives your card a very different look.

My card base is Whisper White Card Stock that I layered with a piece of Gumball Green and then a piece of Primrose Petals Core'dinations Card Stock.  I ran this piece through my Big Shot with the Beautifully Baroque Embossing Folder and then sanded it to get the pattern to come through.  You can get the look you want either by sanding just a little, or by taking off more of the paper and sanding a lot.  It really depends on what look you are going for.  I then punched a piece of Gumball Green Card Stock with my Blossom Punch and stamped my sentiment onto a piece of Whisper White Card Stock that was cut out with a Floral Frames Framelit. 

To finish my card I added a piece of Whisper White 5/8" Organza Ribbon.

The following were used:
Card Stock: Whisper White #100730, Gumball Green #126840, Primrose Petals Core'dinations #129957 (2012-24 In Color Pack)

Ink:  Primrose Petals #126858
Stamp Set: Love & Sympathy #128652 w or #122797 c
Tools:  Big Shot #113439, Beautifully Baroque Embossing Folder #130917, Floral Frames Framelits #127012
Punch:  Blossom #125603
Ribbon:  Whisper White 5/8" Organza #114319

Thursday, November 28, 2013

Happy Thanksgiving

I want to wish everyone a very Happy Thanksgiving.  I am taking the day off from stamping to spend time with my family.  Lots to eat, football to watch, and more memories to create.  It doesn't get any better than that.  

In honor of the holiday, I thought I would just share some of my favorite Thanksgiving projects all in one spot.  Enjoy your day!


Wednesday, November 27, 2013

Another Masculine Birthday Card

Yes, another masculine birthday card.  But, they are always in demand at my stamp classes.  So I finally got  around to using my  Alphabet Press Embossing Folder to give me a simple, yet appropriate background.

My card base is Night of Navy Card Stock that I embossed with the Alphabet Press Folder.  I then cut strips of Gumball Green and Crushed Curry Card Stock, and another strip from the Birthday Basics Designer Paper Pack.   I also added a piece of 3/8" Denim Jean Ribbon, an snipped all of the ends to make them look like small banners.

My sentiment was stamped onto a piece of Soft Sky Card Stock, and I cut these ends as well.  Because the card base is so dark I cut a piece of Whisper White Card Stock for the inside to leave a nice place to write a birthday message.

The following were used:
Card Stock: Night of Navy #100867, Crushed Curry #131199, Gumball Green #126840, Soft Sky #131203, Whisper White #100730
Designer Series Paper: Birthday Basics #130145
Ink: Night of Navy #126970
Stamp Set: Bring on the Cake #128490 w or #121958 c
Tools:  Big Shot #113439, Alphabet Press Embossing Folder #130916
Ribbon:  3/8" Denim Jean #125053


Monday, November 25, 2013

Christmas Tagables

Christmas Tagables Photopolymer Stamp Set was used for today's card.  These stamps also go nicely with the Pop & Place Holiday Gift Tags Bundle and can be purchased together for a discount.

My card base is Real Red Card Stock with a layer of Garden Green and Season of Style Designer Series Paper.  I added a piece of Real Red 1/8" Taffeta Ribbon and then cut my banner out using a Hearts a Flutter Framelit and punched my sentiments with the 7/8" Scallop Circle.

The following were used:
Card Stock:  Real Red #102482, Garden Green #102584, Whisper White #100730
Designer Series Paper:  Season of Style #132340
Ink:  Real Red #126949
Stamp Set:  Christmas Tagables #134623
Punch:  7/8" Scallop Circle #129404
Tools:  Big Shot #113439, Hearts a Flutter Framelits #130159

To purchase the Christmas Tagables with the Pop & Place Holiday Gift Tags in a bundle the number is #135921 and can be seen below.

Friday, November 22, 2013

Label Card Thinlits Birthday Care

Thinlits are a unique way to create a card that flips in just one step.

My card base is Bermuda Bay Card Stock that I cut using my Label Card Thinlit.  I then cut two additional pieces, one with Crushed Curry Card Stock, and one with a sheet of Birthday Basics Designer Series Paper.  Both of these pieces were also cut using the Thinlit so they would fit exactly over the opening.

Next I stamped my birthday cake on a piece of Whisper White Card Stock and cut it out using the coordinating framelit.  I stamped an additional sentiment on the inside and in only a few minutes my flip card is done.

You get the following framelits with your purchase - the large piece that cuts your card and all of the cute little framelits to help with your creation.


The following were used:
Card Stock:  Bermuda Bay #131197, Crushed Curry #131199, Whisper White #100730
Designer Series Paper:  Birthday Basics #130145
Ink:  Bermuda Bay #131171
Stamp Set:  Bring on the Cake #128490 w or #121958 c
Tools:  Big Shot #113439, Labels Card Thinlits Die #133479


  Watch the video below to see how easy they are to use. 


Monday, November 18, 2013

You're In My Thoughts

  
I have been having fun with the new stamp sets I purchased when Stampin' Up! had their big 25% off sale.  The newest set for me to play with is Oh, Hello which I used for today's post.

My card base is Very Vanilla Card Stock.  I stamped my top images and then cut them out to give them more dimension.  My large oval was cut with an Oval Framelit, and then I thought the card needed a bit more, so I stamped the large flower on the right.  I cut out my sentiment and placed it in the center of the oval using Dimensionals.  A quick and easy card to make.  Just change the sentiment in the middle and you have a design for a lot of occasions.

The following were used:
Card Stock:  Very Vanilla #101650
Ink:  Basic Black #126980
Stamp Sets:  Oh, Hello #131931 w or #130733 c, A Dozen Thoughts #131056 w or #131059 c
Adhesive:  Dimensionals #104430
Tools:  Big Shot #113439, Oval Framelits #129381

Friday, November 15, 2013

Masculine Birthday Card

I used two stamp sets that I wouldn't usually select for creating a masculine birthday card, but I think they worked when I combined them with some Soho Subway Designer Series Paper.

My card base is Very Vanilla Card Stock, with a layer of Soft Suede, and then my Soho Subway DSP.  I stamped my arrows using Soft Suede Ink, added some Soft Suede Ribbon, and then placed my Happy Birthday in the center using Dimensionals.  I usually have requests for masculine birthday cards every month at my stamp classes, and sometimes you have to think outside the box and use sets that you normally wouldn't select for that occasion. 

The following were used:
Card Stock: Very Vanilla #101650, Soft Suede #115318
Designer Series Paper: Soho Subway #130140
Ink: Soft Suede #126978
Stamp Sets:  Hello, Lovely #130240 w or #130243 c, Timeless Talk #126605 w or #126607 c
Ribbon:  Soft Suede 3/8" Taffeta #122967

Thursday, November 14, 2013

Stippled Blossoms

Stamping your image right onto your doily creates a soft look, and just what I was looking for in creating a Get Well card for my November Stamp Class. 

My card base is Raspberry Ripple Card Stock that I embossed with the Pretty Print Embossing Folder.  I stamped my full blossom first with Blushing Bride ink,  and then stamped the outlined blossom with Raspberry Ripple Ink. To finish the card I added my get well sentiment and a small piece of Raspberry Ripple 3/8" Stitched Satin Ribbon for a bit more embellishment. 

I used glue dots to adhere my Doily.  I placed them where the doily had the thicker white edges so you wouldn't see them and it stayed nicely without anything showing through.

The following were used:
Card Stock:  Raspberry Ripple #126842, Whisper White #100730
Ink:  Raspberry Ripple #126859, Blushing Bride #131172
Stamp Sets:  Stippled Blossoms #132076 w or #126747 c, Express Yourself #130336 w or #130339 c (Hostess Set)
Tools:  Big Shot #113439, Pretty Print Embossing Folder #132175
Ribbon:  Raspberry Ripple 3/8" Stitched #126845