


Monday, May 31, 2010
Retired Products list tomorrow, June 1st!
Get ready for tomorrow's listing of retired Stampin' Up! stamps and accessories. Retired products sell out quickly, so get your wish list ready so you don't miss out on ordering your favorites! I will post as products sell out and become unavailable.
Friday, May 28, 2010
Ready for the Beach!

Happy Memorial Day Holiday to everyone! I am so looking forward to spending a few days with family and friends at the beach. We have 2 birthdays to celebrate this weekend, and how appropriate is this birthday card for a summer beach birthday. I used the single stamp, Extreme Surfboard and added a background from Extreme Elememts. I love how well these stamp sets go together. To add some texture to the background I embossed my piece of Old Olive Cardstock with the Square Lattice Embossing Folder from the Summer Mini catalog.
The sentiment is from the Four Square Stamp Set which works really nice with the square punches. All done just in time to get ready for a nice weekend. Have a great weekend everyone and hope you all get to relax with family and friends.
For this card I used the following:
Stamp Sets: Four Square #111632, Extreme Surfboard #115173, Extreme Elements #115181
Cardstock: Ballet Blue #100613, Old Olive #100702, Whisper White #100730, Basic Gray #108692
Ink: Ballet Blue #100907, Basic Gray #109120
Embellishments: Big Shot Die Cut Machine #113439, Square Lattice Embossing Folder #119976 (Summer Mini Catalog)
Punches: Scallop Square #112081, 1 1/4" Square #104400
Thursday, May 27, 2010
My Favorite Things


The Fifth Avenue Floral Stamp Set is quickly becoming one of my favorite things. I love the large flowers that are great for creating backgrounds(see the card I posted on May 22nd), and I really like how the image pops when it is embossed, as seen in today's cards. I don't know which card I like better. The first one I made by using Versa Mark Ink to stamp the image all over a piece of Whisper White Cardstock and embossing it with White Embossing Powder and my Heat Tool. I then took my brayer and rolled over the images in Pumpkin Pie ink. As you can see the embossed images did not pick up the ink which really made them stand out. I layered this on top of another piece of Whisper White Cardstock, and used Pumpkin Pie Cardstock as my base. A piece of Whisper White Organza ribbon and the sentiment finished the card. I looked at it for awhile and then thought I would try one doing the same steps but instead of a whole layer of flowers I cut two out and placed them on a piece of Whisper White Cardstock. I thought it needed just a bit more color so I added the Photo Corners in Chocolate Chip Cardstock, and placed this layer on Kraft Cardstock and Pumpkin Pie Grosgrain Ribbon, another one of my favorite things. As you can see you get two totally different looks. Let me know which one is your favorite. And as always, have fun experimenting because you never know what you may come up with!
For the first card I used:
Cardstock: Whisper White #100730, Pumpkin Pie #105117, Chocolate Chip #102128
Ink: Versa Mark #102283, Pumpkin Pie #105216
Punches: Scallop Oval #114889, Modern Label #116630
Stamp Sets: Fifth Avenue Floral #113734, Warm Words #115108
Embellishment: White Embossing Powder #109132
Accessories: Heat Tool #100005, Brayer #102395
Ribbon: Whisper White Organza #114319
For the second card:
Cardstock: Whisper White #100730, Chocolate Chip #102128, Kraft #102125
Ink: Versa Mark #102283, Pumpkin Pie #105216, Chocolate Chip #100908
Punch: Photo Corner #109042
Stamp Sets: Fifth Avenue Floral #113734, Teeny Tiny Wishes #115370
Ribbon: Pumpkin Pie 1 1/4" Striped Grosgrain #115616
Embellishment: White Embossing Powder #109132
Accessories: Heat Tool #100005, Brayer #102395
Wednesday, May 26, 2010
Congratulations!

One of the many perks of being a Stampin' Up demonstrator is the wealth of information available from the company and fellow demonstrators. We have our own web-site where talented men and women post pictures of their cards and projects. We are encouraged to Case each other's work (Copy and Share Everything) and when I needed some new inspiration for wedding cards, (I have 4 to attend in the next few months), I knew that inspiration was only a click away. I would like to give credit to Shauna Mikuliak for her design that I based today's card on. After changing a few things I came up with a wedding card that I really love.
I started with a base of Whisper White Cardstock, layered with Brushed Gold and Bride Specialty Designer Series paper. A smaller layer of Brushed Gold and Whisper White were used for the sentiment which I embossed with Gold embossing powder. This really makes it stand out and gives the card an elegant look. I punched two hearts with my Full Heart Punch and then ran them through my Big Shot using the Polka Dot Impressions Folder. I hope the Bride and Groom like it as much as I do.
To make today's card:
Cardstock: Whisper White #100730, Brushed Gold #102935
Designer Series Paper: Bride #115669
Stamp Set: Well Scripted (Occasions Mini)
Ink: Versa Mark #102283 used with Gold Embossing Powder #109129
Punch: Full Heart #113693
Accessories: Big Shot Machine #113439, Textured Impressions Folder Perfect Polka Dots #117335 (Occasions Mini - will be carried over in the 2010-2011 Idea Book & Catalog)
To join my team of Independent Stampin' Up Demonstrators and receive wonderful benefits from the company as well as access to fellow demonstrators who share their creativity and knowledge you can click the Join My Team button on my blog, send me an e-mail, or give me a call. I will be happy to work with you, and help you get your business started and start you off on your own journey of creativity and fun!
Monday, May 24, 2010
Scallop Envelop Box Gift Set

 Making gift boxes with the Scallop Envelope Die is easy once you do the first one, and see how it all comes together. I hope the following pictures and instructions help you to see how I put it together.


By cutting two Big Die Scallop Envelopes, an extra strip of 1 1/2" x 11" cardstock to go around the sides and bottom, you have created a really cute gift box that holds your selection of 3 x 3 cards.
To put the box together first you cut your two envelopes. Place sticky strip along one of the bottom flaps and adhere the two flaps together. Now you have a partial box with no sides. Take your strip of cardstock and place it evenly around the bottom and sides. I placed sticky strip on the bottom of the box and the two small side flaps on each envelope and folded the small strip of cardstock over the sides.
Now you have your box, and all that is left to do is to decorate it. I used coordinating cardstock and Designer Series paper for both the box, the cards, and envelopes.
To make the box I used the following:
Cardstock: Rich Razzleberry #115216, Crushed Curry #115319
Designer Series Paper: Razzleberry Lemonade #115675
Ribbon: Dusty Durango Polka Dot Grosgrain #115609
Embellishment: Flower Brad #112579
Big Shot Machine #113449, Scallop Envelop Bigz Die #113462
Accessories: Sticky Strip #104294
For the 3 x 3 cards:
Cardstock: Rich Razzleberry #115316, Crushed Curry #115319, Dusty Durango #115321, Melon Mambo #115320, Very Vanilla #101650
Designer Series Paper: Razzleberry Lemonade #115675
Ribbon: Rich Razzleberry Polka Dot #115613, Dusty Durango Polka Dot #115609, Crushed Curry Polka Dot #115614
Punches: Scallop Square #112081, 1 1/4" Square #104400, Scallop Oval #114889, Wide Oval #112082, Eyelet Border #113692, Scallop Oval #109043, 1 1/4" Circle #104403, Small Oval #107304 - I also used a gift tag cut from the Matchbox Die #114890
Stamp Sets: Teeny Tiny wishes @115370, Sincere Salutations @115058, Four Square #111632, Circle Circus #115778
Accessories: Mini Square Envelopes #107309
Saturday, May 22, 2010
Happy Graduation

Sorry for the wording on the side. Don't know what happened!
Over the weekend we celebrated our son's girlfriends college graduation. I knew I wanted to get her a nice pair of earrings, and the Matchbox Die is the right size box for small items and the earrings fit perfectly. Matching the card with the box gives your gift that extra special look and it shows that you put thought into making it. I love being able to make handmade cards and presents, and Stampin' Up! makes it easy with their matching cardstock, ink, and accessories.
To make the card:
Cardstock: Whisper White #100730
Designer Series Paper: Cottage Wall #115671
Ink: Rich Razzleberry #115658
Stamp Set: Teeny Tiny Wishes #115370, Well Scripted #117072 (Occasions Mini)
Punch: Scallop Square #112082
Accessories: Big Shot Die Cut Machine #113439, Beautiful Wings Embosslits Die #118138 (Occasions Mini - will be carried over in the 2010-2011 Idea Book & Catalog)
Embellishments: Dimensionals #104430
For the box:
Cardstock: Certain Celery #105125 (for the bottom of the box)
Designer Series Paper: Cottage Wall #15671 (for the top of the box)
Accessories: Big Shot Machine #113439, Matchbox Die #114890, Extended Cutting Pads #113478
Ribbon: Whisper White Organza #114319
New Fifth Avenue Floral

Here is the updated version of the card I made yesterday. I thought it needed a little something extra in the flowers so I just took my basic black marker(#100082) and using the fine tip end I just added some dots to the middle of my flowers. Now it looks finished to me, and I am happy with the results.
Thursday, May 20, 2010
Fifth Avenue Floral

I love the large flowers in the Fifth Avenue Floral stamp set. By stamping multiple images of one of the flowers on a piece of Whisper White cardstock I was able to create my own unique background. Adding some Platinum Shimmer Paint to the middle of the flowers gave them that little extra sparkle. I think I might add some black dots to the middle of the flower too, I'll post tomorrow on the new look.
I saw a similar card on Mary Fish's Stampin' Up! blog and had to try to it out for myself, and I really like the results, I hope you like it too.
Stamping Tip: Creating your own backgrounds on your cardstock is easy. Just find a stamp that you really like and repeat the pattern several times. It creates a really dramatic look, and works great when you don't have just the right piece of Designer Series Paper to go with the look you want. I used only one color of ink on today's card, but you can really go any direction - keep it one color, or add as many as you want. Just play around with it and you will be surprised at all of the great backgrounds you can create.
For today's card:
Cardstock: Rose Red #102544, Basic Black #102851, Whisper White #100730
Designer Series Paper: Rose Red Patterns #112162
Stamp Set: Fifth Avenue Floral #113734, Whimsical Words (Sale-a-bration)
Ink: Basic Black #101179
Punch: Scallop Oval #114889
Ribbon: Basic Black 5/8" Satin #117285
Embellishment: Platinum Shimmer Paint #116807 (Holiday Mini Catalog) - item will be carried over into the 2010-2011 Idea Book and Catalog
Wednesday, May 19, 2010
Bridal Shower Invitation

A friend asked me to make invitations for a couples bridal shower that were clean and simple, not too many layers, no bows or extra embellishments, and not a standard card size. When I saw the champagne glass stamp in the Cheers to You stamp set I knew it was exactly what she wanted. Just a little something stamped on the invitation to represent the celebration that was going to take place. Since I had already made the brides Save The Dates, I knew her color scheme was vanilla, gray, and gold so I used these same colors for the invitation.
I used my computer to print the wording, cut it and layered it onto a piece of Basic Gray cardstock, stamped my Champagne glasses and then painted them using Champagne Mist Shimmer Paint. My friend was pleased with the results and I wish you could see the invitations in person because even though they are so simple in design, the shimmer paint makes the champagne sparkle and stand out.
Tip of the day: When making any type of invitation if you are not using the standard card size of 5 1/2" x 4 1/4" check out the availability of getting envelopes in the size of the invitation you will be making. I wanted to use ivory envelopes so for this invitation I made the gray layer a little larger so it would fit nicely into a 8 3/4" x 3 3/4" envelope that I knew I could purchase locally in the size and color needed.
To make this invitation I used the following:
Cardstock: Basic Gray #108692, Very Vanilla #101650
Ink: Basic Black #101179
Stamp Set: Cheers to You #114944
Embellishment: Champagne Mist Shimmer Paint #116806 (Holiday Mini Catalog). The Shimmer Paint will be carried over to the new 2010-2011 Idea Book & Catalog.
Punch Cards

One of my customers asked if I could make cards using the two punches she recently purchased - the Curly Label Punch and Large Oval Punch and this is what I came up with.
The first card uses the Curly Label and Butterfly Punch. The only stamp set was Teeny Tiny Wishes for the sentiment. I love the colors pink and brown together, so I used Pretty in Pink and Chocolate Chip cardstock for the Curly Label punch, some scrap pieces of Sending Love Specialty Designer Series Paper for the butterflies (from the Occasions Mini) and layered all of this onto Very Vanilla cardstock, added some Chocolate Chip ribbon to finish the card front which I then placed onto my card base using Kraft cardstock.
The second card uses the Large Oval, Large Star, Star, Word Window, and Modern Label Punch. The only stamp set was Teeny Tiny Wishes for the sentiment. I used Bashful Blue cardstock for the base of the card, Going Gray for the layer, Ballet Blue and Basic Gray for the oval punches, and mixed the colors for the star and word punches. So with a little bit of imagination you can make cards only using your punches.
Let me know what you think, and if you come up with some creative punch cards of your own I would love to see them.

For the first card I used the following:
Cardstock: Kraft #102125, Pretty in Pink #100459, Chocolate Chip #102129, Very Vanilla #101650
Designer Series Paper: Sending Love Specialty (Occasions Mini) retired
Ribbon: Chocolate Chip 1/4" Grosgrain #111367
Punches: Curly Label #112208, Butterfly #116629
Stamp Set: Teeny Tiny Wishes #115370
Ink: Chocolate Chip #100908
For the second card:
Cardstock: Bashful Blue #105120, Basic Gray #108588 (neutral pack), Basic Gray #108692, Ballet Blue #100613
Punches: Large Oval #107305, Word Window #105090, Modern Label #116630, Large Star #110710, Star #109045
Stamp Set: Teeny Tiny Wishes #115370
Ink: Basic Gray #109120
Tuesday, May 18, 2010
Easel Card

I saw many different ways to make Easel Cards, but I wanted mine to fit in a standard envelope so I changed some of the dimensions and wanted to share it with you. To start I took a piece of 8 1/2" x 11" cardstock and cut it in half to make it 4 1/4" x 11". I then took an inch off of the length to make it 4 1/4" x 10". Next I scored the cardstock at 2 1/2" and 5" and went over my score lines with my bone folder to give it a good crease.

Next I made my card front and it measures 4 1/4" x 5" for the white cardstock base, and 4" x 4 3/4" for the Pretty In Pink Layer. I ran my Pretty in Pink through my Big Shot using the Background#1 Texturz Plate to give it a nice impression, punched my birds, added a ribbon and a sentiment. Now when placing the card front on the base you only add adhesive to the area up to the first 2 1/2" score line. Now to make the card stand up like an easel, I added a Basic Gray Corduroy Button to my bottom layer (the 10" piece of cardstock) at the 2 1/2" mark. Next bend your card front at the 2 1/2" score line forward and tuck it behind your embellishment and you have your easel card. I stamped some vines from the Cheep Talk stamp set to the cardstock, and placed a few pink hearts in the middle to finish the look.


I hope that makes sense. Once you start working on it and you see how the paper folds it all comes together. But feel free to leave comments or e-mail me if you have any questions.
To make this card I used the following:
Cardstock: Pretty in Pink #100459, Going Gray #108588, Whisper White #100730
Stamp Set: Teeny Tiny Wishes #115370, Cheep Talk #113204
Ink: Basic Gray #109120
Punches: Extra Large Two-Step Bird #117191, Small Heart #117193 (both from the Occasions Mini but still available), Modern Label #116630, Word Window #105090
Ribbon: Basic Gray Taffeta #109064
Embellishment: Basic Gray Corduroy Button #114345
Big Shot Machine #113439, Impressions Pad #114614, Silicone Rubber #114615, Backgrounds #1 Texturz Plate #114512
Accessories: Bone Folder #102300, Snail Adhesive #104332
Monday, May 17, 2010
Matchbox Die Box

My friends and I usually don't give each other gifts for our birthday, we just like to go out for a nice lunch or dinner, but we always do remember each other with a card. So in keeping with that tradition, I decided for one of my friends birthday's this month I would make her a card and just give her a little something by filling the Matchbox Die Box with 4 Hershey Nuggets. It's not really a gift, but just a way of saying that I am thinking of her on her special day. What's also nice about the matchbox die is that is has 3 different gift tags for you to choose from right on the die.
Tip of the Day: Use coordinating cardstock and Designer Series Paper for both the card and gift box to give it that really special look. So simple, but yet so pretty. And notice, the only stamp I used on my card is the sentiment, the paper had enough pattern in it that I didn't even need to add an extra stamped image.
For the card:
Cardstock: Pretty in Pink #100459, Certain Celery #105125, Whisper White #100730
Designer Series Paper: Tea Party #113992
Ink: Certain Celery #105217
Ribbon: Pretty in Pink Taffeta #109067
Punches: Scallop Oval #114889, Eyelet Border #113692
Accessories: Dimensionals #104430
Stamp Set: Sincere Salutations #115068
For the box:
Big Shot Machine #113439, Matchbox Die #114890, Extended Cutting Pads #113448
Cardstock: Pretty in Pink #100459 (for the bottom of the box)
Designer Series Paper: Tea Party #113992 (for the top of the box)
Ribbon: Whisper White Organza #114319
Stamp Set: Teeny Tiny Wishes #115370
Friday, May 14, 2010
Gift Boxes and Bookmarks

All of these Teacher Appreciation Gifts - the Gift Box, Bookmark, and Thank You Card were made using one pack of Designer Series Paper, and 3 pieces of assorted cardstock. Best of all, I purchased the Designer Series Paper when it was on the Clearance Rack, so it was really a bargain, and I even have some paper left over to make a few more boxes. I will fill the boxes with some Hershey Kisses placed in a cello bag and tied with coordinating ribbon. Check out today's two other posts for supplies used for the box and bookmark. The 3 x 3 thank you cards were made using assorted cardstock, and the scallop oval and small oval punch. The saying on the card was from the Oval All Stamp Set #113790.
Bookmark
Sorry I posted my blog entries out of order today. The second entry shows the completed gift box and bookmark.
Here are the step by step instructions for making the bookmark:
Using the Petal Card Bigz Die run your paper through your Big Shot Machine and this is what it looks like:
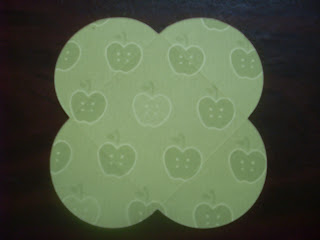
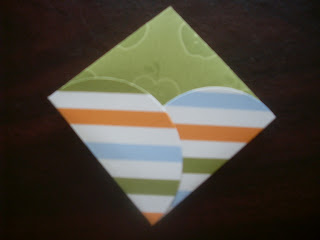
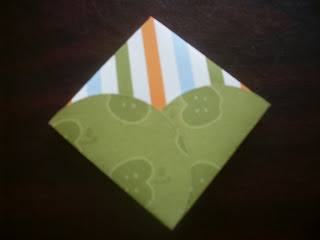
Next, fold down two of the flaps and using sticky strip adhere them together. Now you can stop here and you would have a really nice favor just by itself, but to make the book mark turn the paper over and adhere the other two sides:
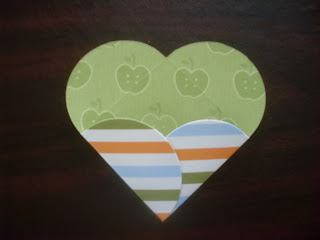
Now you have your reversible book mark.
For the bookmark I used the following:
Big Shot Machine #113439, Premium Crease Pad #113476 (keeps lines from cutting through), Petal Card Bigz Die #113467
Designer Series Paper: Summer Picnic
Sticky Strip #104294
Here are the step by step instructions for making the bookmark:
Using the Petal Card Bigz Die run your paper through your Big Shot Machine and this is what it looks like:

Next, fold down two of the flaps and using sticky strip adhere them together. Now you can stop here and you would have a really nice favor just by itself, but to make the book mark turn the paper over and adhere the other two sides:

Now you have your reversible book mark.


For the bookmark I used the following:
Big Shot Machine #113439, Premium Crease Pad #113476 (keeps lines from cutting through), Petal Card Bigz Die #113467
Designer Series Paper: Summer Picnic
Sticky Strip #104294
Thursday, May 13, 2010
Happy Graduation

Graduation time is here and in the new Summer Mini Catalog Stampin' Up has some great individual stamps for sale, like the Happy Grad stamp used in today's card.
I love how bold the greeting is and I love the wording on it too. It sells for only $8.95 and is a stamp that I know I will keep in my collection for a long time since it will never go out of style. I used only one color of ink for my saying, but if you wanted to add more color or make the Happy Graduation stand out even a little more you could use a Stampin' Up marker, dauber, or sponge to color over a particular word. The Square Lattice Embossing Folder made a nice impression on the base of the card and my favorite 1 1/4" Striped Grosgrain Ribbon added a nice accent.
If you never used this ribbon you will be surprised to find out how soft it is. I thought at first it would add too much bulk to my cards but it doesn't and it has become my favorite ribbon of all. It currently comes in four colors and I hope when the new catalog comes out in July they have even more. To finish the card I punched a small star and used a dimensional to make it pop up.
This is one of the cards we will be making next Tuesday at my Summer Mini Card Class, and if you would like to join us just drop me an e-mail, or feel free to call if you have any questions. And don't forget my online store is open 24 hours a day and is just a click away.
Products used to make this card:
Cardstock: Kraft #102015, Whisper White #100730, Chocolate Chip #102128
Ink: Not Quite Navy #103008
Stamp Set: Happy Grad #117006 (Summer Mini)
Punches: Star #109045, Corner Rounder #109047
Accessories: Big Shot Die Cut Machine #113439, Square Lattice Textured Embossing Folder #119976 (Summer Mini)
Ribbon: Chocolate Chip 1 1/4" Striped Grosgrain #115617
Tuesday, May 11, 2010
Punch Purse Card

I know I said it before, what lady doesn't like a new purse, and if you can't buy the real thing why not send one in a card with a note for a birthday, thank you, thinking of you, or any other special occasion. Today's card was created using punches, some pretty paper a ribbon and a brad. Really simple and quick to make, and by leaving it blank with no sentiment it can be used for multiple occasions and ready to be stamped with those special words.
I used the following Stampin' Up supplies:
Cardstock: Pretty in Pink #100459, Chocolate Chip #102128, Whisper White #100730
Designer Series Paper: Sending Love Specialty (Occasions Mini)
Ribbon: Pretty in Pink 5/8" Satin (Occasions Mini)
Punches: Wide Oval #112082 for purse, Large Oval #107305 layered over scallop punch, Small Oval #107304 folded for brown clasp , Scallop Oval #114889 for handle
Embellishment: Silver Brad #104336
Monday, May 10, 2010
Oval Scallop Frame

As you can probably tell from a lot of my posts, I love my Big Shot Die Cut Machine. There is such a large selection of big dies, texture plates, embossing folders, and embosslit dies, in a wide variety of shapes, sizes, and patterns that I use it almost daily. When I joined Stampin' Up as an Independent Demonstrator it was the first thing I added to my already vast collection of products. I use it not only to add layers or textures to my cards, but for gift bags and boxes, shower and wedding favors, special holiday gifts and so much more. A great way for you to purchase your own machine is to host a workshop and use your hostess credits towards the purchase price, or join my team of Independent Demonstrators and receive it and any products you purchase at 20% off. Ask me for details or stop by to try it out for yourself.
For the get well card posted today I used the Oval Scallop Frame. When cutting the frame you can use both the inner oval and the outer scallop frame together, or you can just use one by itself. First I cut with a piece of Bella Bleu Designer Series Paper, and then a piece of Not Quite Navy Cardstock, and used only the frame from the Bella Bleu and the oval from the Not Quite Navy. I saved the pieces I didn't use and will have a frame of Not Quite Navy and an oval of Bella Bleu for another card. I added a few butterflies cut from Beautiful Wings Embosslits Die and sponged a little bit of Not Quite Navy ink on them and then embossed the sentiment by stamping it with Versa Mark Ink and then heat embossing with White Embossing Powder to finish the card.
To make the card I used the following:
Cardstock: Not Quite Navy #100867, Very Vanilla #106530
Designer Series Paper: Bella Bleu #113974
Ink: Versa Mark #102283
Big Shot Machine #113439, Oval Scallop Frame #114521, Beautiful Wings Embosslite Die #118138
White Embossing Powder #109132, Heat Tool #100005
Stamp Set: Sincere Salutations #115068
Sunday, May 9, 2010
Manhattan Flower

For today's card I used the Textured Impressions Embossing Folder Manhattan Flower which creates a strong embossed image and is sized for the front of a standard card. I embossed the image on vellum cardstock with the Big Shot Die-Cut Machine and cut around the flower. Layering it onto a piece of Crushed Curry Cardstock the image really stands out. A touch of ribbon and a sentiment finish the card. I saw similar versions of this card on several other Stampin' Up blogs, so thanks go to all of those demonstrators out there who share their wonderful ideas.
Today's tip: When making a card, why not make two. If you are cutting a standard piece of cardstock in half you already have the base for two cards so just finish the second one with everything but the sentiment. Later when you need a card in a hurry you will have a nice supply on hand to choose from. Today I made the Manhattan Flower card a birthday card, but I could use the second card for Get Well, Thank You, Thinking of You, or whatever the occasion calls for.
To make this card I used the following:
Cardstock: Crushed Curry #115319, Vellum #101856
Ink: Rich Razzleberry #115658
Accessories: Big Shot Die Cut Machine #113439, Manhattan Flower Embossing Folder #114517
Stamp Set: Well Scripted #117071 (Occasions Mini)
Ribbon: Crushed Curry Polka Dot Grosgrain #115614
Wednesday, May 5, 2010
Fifth Avenue Floral

Thanks goes to fellow demonstrator AnaMarie Palmorin for the inspiration for this card. I saw a similiar version posted on her blog and added just a few changes to create this card that can be used for a wedding or anniversary. Using the Square Lattice Embossing Folder I created a layer that stands out even though it is the same color as the base card. It really gives it a nice, elegant look. I did not want a lot of color on my flowers, so I used pastels to give them just a hint of color. Dimensionals made everything stand out and sponging a small amount of gray ink around the edges of the saying gives it a polished look.
Cardstock: So Saffron #105118, Whisper White #106529
Ink: Basic Gray #109120
Stamp Set: Fifth Avenue Floral #113734, Together Forever #115100
Ribbon: 5/8" Basic Gray Satin Ribbon (Occasions Mini)
Punches: Scallop Oval #114889, Corner Rounder #109047
Accessories: Big Shot Machine #113439, Square Lattice Embossing Folder #119976 (Summer Mini), Dimensionals #104430, Sponge #101610, Pastels #105542
Tuesday, May 4, 2010
Elmo and Friends Punch Card

When I saw a similar version of this card on fellow demonstrator Nicky Foden's blog I had to try it myself. Making a card with punches just takes a little bit of creativity, and the possibilities are endless. I made my card the standard 5 1/2" x 4 1/4" and with the exception of the eyes that I purchased at a local dollar store, everything else was made with a Stampin' Up punch.
Directions: For the card base I used Whisper White Cardstock #106529, and Basic Black cardstock #102851 measuring 4 1/4" x 4 1/4" was layered on top of the white.
The squares that the characters layer onto measure 2" x 2", and the faces were made using the Scallop Circle Punch #109043.
For Elmo - the mouth is the 3/4" circle punch #107217 cut in half, the nose uses the full 3/4" circle punch. Colors - Real Red #102482, Basic Black #102581, Pumpkin Pie #105117 and the 2 x 2 square is Taken with Teal #101584.
For the Cookie Monster - 3/4" circle punch cut in half for mouth - Colors - Basic Black #102581, Taken with Teal #101584, 2 x 2 square is Old Olive #100702
For Oscar the Grouch- small oval punch #107304 cut in half for the mouth, 1/16" circle #101227 cut in half for the tongue, and I just cut two small triangles in basic black for the eyebrows. Colors used were Old Olive #100702, Basic Black #102581, Real Red #102482, YoYo Yellow #102824 for the 2 x 2 aquare.
Big Bird - 1/2" circle #104390 cut to make eyebrows, and I cut a small triangle for the nose. Colors used were YoYo Yellow #102824, Pumpkin Pie #105117, Taken with Teal #101584, and Real Red #102482 for the square.
Saying comes from the Build a Roo Stamp Set #115948 and Teeny Tiny Wishes #115370.
I hope you have fun creating your own punch cards!
Monday, May 3, 2010
Elements of Style

The Elements of Style Stamp Set from the Summer Mini Catalog is so versatile and can be used for so many different occasions. Thanks to Linda Rodenberg for coming up with the design. I made my version of this card for my mother for Mother's Day, and since I know she doesn't go on line it was safe to post it before she will receive it. For the image, I stamped it in Basic Black Ink, and then filled in the flowers using my blender pen dipped in the ink colors listed below. The blender pens work great when you want to add more than one color to your project. They color on as light or dark as you want, and you can really blend the colors just right. Next I went over the entire image with my versa mark marker and then added clear embossing powder to it and used my heat tool to emboss the image giving it a clear, shiny look. I added my sentiment, embellished it with a bitty button, and used Dimensionals to pop it up. For the finishing touch I sponged a little bit of Rose Red Ink around the edges.
In the picture you don't get the full effect of the embossing or the sponging, but it really adds some sparkle and gives it a really polished look.
To make the card I used the following Stampin' Up products:
Stamp Set: Teeny Tiny Wishes #115370
Cardstock: Kraft #107070, Whisper White #106529, Rose Red #102544
Ink: Rose Red #101778, Regal Rose #105211, Pumpkin Pie #105216, Old Olive #102277
Punches: Itty Bitty Shapes #118309 (Punch Pack from the Summer Mini), Modern Label #116630
Ribbon: Whisper White Organza #114319
Accessories: Versa Mark Marker #100901, Clear Embossing Powder #109130, Heat Tool #100005, Stamping Sponge #101610, Dimensionals #104430
Sunday, May 2, 2010
Box #2 Fancy Purse Favor

What woman doesn't love getting a new purse, and filling one with her favorite chocolates makes it even better.
Using Stampin' Up's Box #2 and Scallop Circle #2 Dies I was able to create a purse that could be used for so many occasions, such as, Mother's Day, Birthday, Thank You, Graduation, Favorite Teacher, and so on. It could be filled with a favorite candy, a special note, tea bags, money, a gift certificate, and so much more.
To make the purse I used the following:
Big Shot Machine #113439, Box #2 Die #114518, Scallop Circle #2 Die #113469 (the larger of the two scallops)
Cardstock: Chocolate Chip #102128
Designer Series Paper #117153 - Sending Love Specialty (Occasions Mini Catalog)
Embellishments: Chocolate Chip Corduroy Button #114339
Ribbon: Pretty in Pink Satin #117289 (Occasions Mini Catalog)
To keep the purse closed, just attach a piece of velcro and you are finished!
Subscribe to:
Posts (Atom)


