Wednesday, September 29, 2010

Make Merry

Once again, a textured embossing folder added such a pretty design that very few layers were needed for this card.

I started with Very Vanilla cardstock and I ran the front of the card through my Big Shot using the Vintage Wallpaper embossing folder.  I ran another small strip of Very Vanilla through the folder for the top layer, and two strips of Cherry Cobbler cardstock were punched with the Eyelet Border Punch and placed under the Very Vanilla layer.  The Make Merry stamp is from Grateful Greetings. 

To make today's card I used the following:
Cardstock:  Very Vanilla #101650, Cherry Cobbler #119685, Always Artichoke #105119
Ink:  Cherry Cobbler #119669
Ribbon:  Cherry Cobbler 1/2" Seam Binding #120992 (Holiday Mini)
Stamp Set:  Grateful Greetings #116511
Punches:  Eyelet Border #119853, Large Tag #119876, Extra Large Tag #119866
Accessories:  Crop-a-Dile #108362, Big Shot Machine #113439, Vintage Wallpaper Embossing Folder #120175

Saturday, September 25, 2010

Door Prize Winners

Had a great time today with all of the men and women who came to my Open House.  The lucky door prize winners are:

Lyne - Fresh Favorite Buttons
Sandy - Chocolate Chip Taffeta Ribbon
Michelle - Four Handstamped Christmas Cards
Carol - In Color Designer Series Paper
Wendy - In Color Designer Series Paper

Thank you everyone for making this another fun day of creating and sharing.  Door prizes will be mailed to winners this week.  Enjoy!


Thursday, September 23, 2010

Get Well Wishes

Grab a few markers and your Aqua Painter and you have another great way to watercolor.

I embossed my card base with the Finial Press embossing folder and layered with Very Vanilla, Poppy Parade, and Sunny Garden Designer Series Paper.  I stamped my image on Watercolor Paper and used my markers to fill in the design and then shaded and blended with my Aqua Painter.  One photo corner punch using the reverse side of the Sunny Garden paper finished the look.

To make today's card I used the following:
Cardstock:   Peach Parfait #119794, Poppy Parade #119793, Very Vanilla #101650
Designer Series Paper:  Sunny Garden #119831
Ink:  StazOn Jet Black #101406
Stamp Set:  Fun & Fast Notes #113500
Punch:  Photo Corner #119878
Accessories:  Watercolor Paper #105019, Aqua Painter #103954, Big Shot Die Cutting Machine #113439, Finial Press Embossing Folder #115963

Wednesday, September 22, 2010

Fifth Avenue Floral Watercolor

I love experimenting with watercoloring, so today I added another step and clear embossed the flower after it was watercolored.  It really added a lot of sparkle and added dimension.

I started with a card base of Baja Breeze, and added a matte layer of Elegant Soiree Designer Series Paper.  I stamped the flower with StazOn Jet Black Ink on watercolor paper, and used my Aqua Painters and Baja Breeze and Crumb Cake ink to fill it it.  When it was dry I took a Versa Maker and colored over the entire flower, took clear embossing powder and sprinkled it over the whole image and embossed with my Heat Tool.  Early Espresso 3/8" Taffeta Ribbon added an extra touch of color.  I also added a small punched strip of Baja Breeze to the left corner because I thought it looked a little bare on that side.

I didn't add a sentiment  because this is one of those cards that could be used for many different occasions. I will add it when that special occasion comes up.  Always nice to have extra cards on hand!

For today's card I used the following:
Cardstock:  Baja Breeze #111352
Designer Series Paper:  Elegant Soiree #117163
Stamp Set:  Fifth Avenue Floral #113734
Ink:  Baja Breeze #111833, Crumb Cake #121030, StazOn Jet Black #101406
Ribbon:  3/8" Early Epresso Taffeta #119964
Accessories:  Watercolor Paper #105109, Aqua Painter #103954, Clear Embossing Powder #109130, Heat Tool #100005, Versa Marker #100901
Punch:  Dotted Scallop Ribbon Border #119275


Thursday, September 16, 2010

Blog Name Change


My blog name has changed.  The old blog of eileensstampinupdesigns.blogspot.com is now
www.EileensStampingCorner.com/

Thank you for making the changes and for following my blog!


Wednesday, September 15, 2010

For the Newlyweds

I wish you could see the color better on this card.  Unfortunately my good digital camera is not working and I had to pull out the old one.  So I apologize but hope you can at least get a good idea for a card -  just imagine it in color! 

I ran the Very Vanilla cardstock through my Big Shot using the Elegant Lines embossing folder.  A small strip of Elegant Soiree Designer Series Paper and 1/8" Early Espresso Taffeta Ribbon decorated the left side and three punches added a nice new look for the sentiment, along with two small pearls.  If you look closely you can see a little bit of shimmer on the DSP.  I used the new Illiminate Top Coat to a few of the swirls for some added dazzle.  

I have to thank all of the talented SU demonstrators who share their work with each other.  The inspiration for the design of this card came from taking several of their ideas and adding a few of my own. 

To make this card I used the following:
Cardstock:  Very Vanilla #101650, Soft Suede #115318, Crumb Cake #120953
Designer Series Paper:  Elegant Soiree #117163
Ink:  Soft Suede #115657
Stamp Set:  Teeny Tiny Wishes #115370
Punches:  Decorative Label #120907, Curly Label 3119851, Modern Label #119849
Embellishments:  Basic Pearls #119247, Illuminate Top Coat #121084
Ribbon:  Early Espresso 1/8" Taffeta #119959
Accessories:  Big Shot Die Cutting Machine #113439, Elegant Lines Embossing Folder #119277

Monday, September 13, 2010

Diaper Fold Halloween Treats

Really simple treat container using the Diaper Fold!


To start cut a piece your paper to 6" x 6".  Next, fold in half on a diagonal, then fold the bottom right end over to meet the left side, then do the same on the left..  All that is left to do is pull the top flap over and you have a really cute gift container that stays together without any adhesive.  Decorate with your favorite saying or ribbon, fill with a treat and your all done.  

As you can see - two different looks with Designer Series Paper depending on which of paper you use.

To make my Halloween Diaper Fold Treat Container I used the following:
Designer Series Paper:  Wicked Fun #117400
Stamp Set:  Grateful Greetings #116511
Ink:  Tangerine Tango #111349
Punch:  Scallop Square #119885
Ribbon:  Raven 1/2" Lace Trim #120985 (Holiday Mini)


Friday, September 10, 2010

Halloween Monster Treats

Monster Treat bags made using the Big Shot and Top Note Die can take on many variations.  Just mix in a few different punches for the face features, sponge a little color onto your cardstock and have fun creating your own style monster.

Both the front and back of the bag were cut with the Top Note Die, but only the front is decorated.  On the back piece I just sponged on some ink for added color.  The hair is a strip of black cardstock also cut with the top of the Top Note Die and then cut into different lengths for bangs.  Circle, square, oval, and word window punches were used for all of the features.  A gel pen added some dimension to the eyes and one monster mouth, and a black marker was used to draw on the green monster mouth.  The bags used for the candy were purchased at a local craft store.  The handle is just a strip of black cardstock and some brads to keep it in place. 

To make today's project I used the following:
Cardstock:  Basic Black #121045, Whisper White #100730, Brocade Blue and Gable Green (Retired)Punches:  Word Window #119857, 1 1/4" Square #119865, 1 3/8" Oval #119863, 1" Circle #119868, 3/4" Circle #119873, 1/2" Circle #119869
Accessories:  Sponges #101610, Uni-ball Signo Gel Pen #105021, Basic Black Marker #100082. Neutral Brads #119736
Ink:  Pumpkin Pie #105216, Old Olive #102277, Perfect Plum #101437

Wednesday, September 8, 2010

Goblin Greetings

Turn your owl upside down and you have cute Ghosts to adorn your Halloween cards.  I got this idea from SU demonstrator Chris Kolly.

I started with a card base of Peach Parfait and added a textured layer of Concord Crush.  I punched out two owls in Whisper White and turned them upside down to create the ghost, adding the eyes and feet also punched in Peach Parfait.  I thought the corners needed a little something so I punched Photo Corners in Basic Black.  The greeting is punched with the new Decorative Label Punch from the Holiday Mini.  This is a great punch for larger sayings or stamped images. 

To make today's card I used the following:
Cardstock:  Peach Parfait #119794, Concord Crush #119792, Whisper White #100730, Basic Black #121045
Stamp Set:  Grateful Greetings #116511
Ink:  Basic Black #101179
Punches:  Two-Step Owl #118074, Photo Corners #119878, Decorative Label #120907 (Holiday Mini)
Accessories:  Big Shot Die Cut Machine #113439. Square Lattice Embossing Folder #119976

Tuesday, September 7, 2010

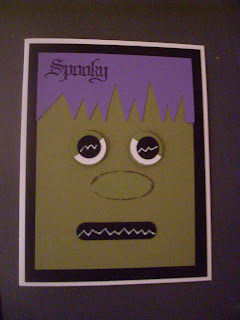
Monster Halloween

Grab a few punches and a pair of good scissors and you are on your way to making this Monster of a Halloween card. 

I started with a card base of Whisper White cardstock, and a layer of Basic Black.  For the monster's face I used Old Olive cardstock, and Lavendar Lace Cardstock (retired) for his hair.  To make the bangs I just cut irregular shaped triangles all the way across.   For the eyes I punched two Old Olive circles and two Whisper White circles with the 3/4" circle punch.  I cut the Whisper White circles in half and placed them over the Old Olive Circles.  Next I used the 1/2" Circle Punch for the black circles in the center of the eyes. The punch for his nose is the 1 3/8" Oval, and Word Window punch was used for the nose.  I took the uni-ball Signo Gel Pen to add the lines to the eyes and mouth.  The only stamp used was the Spooky stamped in the corner.

I got the idea for this from my Upline Maureen Stivala when she did a workshop for me last year before I became a demonstrator.  We made a similar face for treat bags, and I just modified it into a card.  So if you don't have a lot of Halloween stamps, just get creative with some punches and scissors and see what you can come up with too. 

Check back tomorrow to see the Owl punch turned into a Ghost!

For today's card I used the following:
Cardstock:  Whisper White #100730, Old Olive #100702, Basic Black #121045, Lavender Lace (retired)
Ink:  Basic Black #101179
Stamp Set:  Wicked Cool #118738 wood mount or #120600 clear mount
Punches:  Word Window #119857, 1 3/8" Oval #119863, 3/4" Circle #119873, 1/2" Circle 119869
Embellishment:  uni-ball Signo Gel Pen #105021
Accessories:  Paper Snips #103579

Sunday, September 5, 2010

Grand Opening Invitation

I love this layout for invitations.  It leaves enough room for the information and design.

I was asked to make invitations for an Open House of a new design showroom.  The owner's business cards are a combination of black and different shades of green, so the color scheme of the invitation that uses Basic Black and Very Vanilla Cardstock, Old Olive ink and ribbon was just perfect.  I stamped the large leaf before I embossed it with the Square Lattice Embossing Folder for added texture and dimension.

When I am making a large number of one type of card or invitation I usually work in steps. I needed 150 invitations so first I printed the words on the cardstock, getting three invitations on one 8 1/2" x 11" piece of Very Vanilla Cardstock.  Next I cut all of the Very Vanilla cardstock to 8 1/2" x 3 1/2".   I then stamped the large leaf on all of them, and ran each one through my Big Shot (I was able to run 3 at a time) using the Lattice Square folder.  I then cut all of my ribbon to size and adhered it to the invitation using Snail Adhesive.  I then cut my Basic Black cardstock to 8 3/4" x 3 3/4", getting two cuts from an 8 1/2" x 11" piece of cardstock.  The last step was placing the finished invitation on top of the Basic Black and again I used my snail adhesive. 

To make the invitation I used the following:
Cardstock:  Basic Black #121045, Very Vanilla #101650
Ink:  Old Olive #102277
Ribbon:  Old Olive 5/8" Grosgrain #109054
Stamp Set:  Paradise #113778
Accessories:  Big Shot Die Cut Machine #113439, Square Lattice Embossing Folder #119976, Snail Adhesive #104332