Monday, January 31, 2011

Get Well Owl

Now who wouldn't feel better after receiving this cute little owl get well card?  Hopefully it makes the recipient feel better soon.

For today's card I started with Crumb Cake cardstock followed by a layer of Old Olive DSP from the Brights Paper Stack.  I love this Designer Series Paper Stack.  Each color family comes with 40 sheets of 2 double-sided designs, so there is always a color that coordinates well for your project.  I bought this paper when it first came out in July and have used it often, but still have so much more to choose from. The owl was punched in Early Espresso cardstock, the same color used for the layer on top of the DSP, and I added a bit of the Old Olive DSP and Crumb Cake to dress him up.  The Little Leaves were run through the Die Cut Machine and I used glue dots to adhere them to the card.   

To make today's card I use the following:
Cardstock:  Crumb Cake #120953, Early Espresso #119686, Very Vanilla #101650, Old Olive #100702
Designer Series Paper:  Brights Paper Stack #117155
Ink:  Old Olive #102277
Stamp Set:  Word Play #120308 wood or #120651 clear
Punches:  Extra Large Oval #119859, Two-Step Owl #118074
Accessories:  Big Shot Machine #113439, Little Leaves Sizzlits Die #114511, Glue Dots #103683
Embellishment:  uni-ball Signo Gel Pen #105021

Saturday, January 29, 2011

Clear Block Storage

Old way of storing clear mount stamps.


New, more organized way of storing clear mount stamps.
When I attended regionals this past fall one of the new things I learned was a much easier way to store your clear mount stamps.  Instead of just throwing away the rubber backing that the stamps come in, when you are done assembling your stamps, put them back in the same spot they were packaged in.  This way, when you close your case, the stamps stay put.  It is much easier to find the one you are looking for, and keeps the small stamps from getting lost.  I wish I would of thought of it myself before I threw away the backing for the ones I already had assembled, but for all of the new ones I have bought since then, I really like this storage method. 

I'm sure many of you reading this have been doing it this way for a long time, but just thought I would share it with anyone who might not have heard this idea before.   There is always something new to learn, and I would love any of my readers to share any of their stamping tips too.  Please feel free to leave a comment after any of my posts.   Have a great weekend everyone, and for those of you living on the East Coast like me, let's hope for a few days of NO SNOW!  All that shoveling takes away from my stamping time, and I really hate to give up my stamping time!!!

Friday, January 28, 2011

Wedding Invitations

Wedding invitation with coordinating envelope. Top of invitation stamped and then embossed.

RSVP Card and Reception Card with Coordinating Envelope

Back of RSVP and Reception Card - Embossed with Square Lattice Embossing Folder

I was honored when a friend's daughter asked me to make her wedding invitations.  We finally came up with the black and white stamped and embossed invitations and matching RSVP and Reception cards.  To add some WOW to the envelopes, I stamped them with the same design used on the invitation.  A quick solution to add some elegance to a plain white envelope.

When stamping and embossing, remember to stamp your image first, then emboss. 

To make the invitations I used the following:
Cardstock:  Basic Black #121045, Whisper White #100730
Ink:  Basic Black #101179
Stamp Set:  Elements of Style #118611 wood or #120045 clear
Ribbon:  Basic Black 5/8" Grosgrain #115605
Accessories:  Big Shot #113439, Square Lattice Embossing Folder #119976

Tuesday, January 25, 2011

Baby Shower Invitations

I was asked to made baby shower invitations for a friend.  The bedding is from Pottery Barn and I tried to capture the colors and pattern in the sheets for the invitation.  I made two samples and not sure which one will be used.  A few adjustments might have to be made depending on her style, but it was fun coming up with some new designs.
Front of Invitation - Invitation #1


Inside of invitation where infomation will be typed.
  Coco Dot Nursery Bedding
Bedding from Pottery Barn for the nursery.

Invitation #2 - Inside will have information.

Check back to see which one she selected and to see if any changes will be made.  I will then post what supplies and products were used.  I would love to hear your comments and let me know which one you would choose.


Monday, January 24, 2011

Super Quick Valentine Cards

Same layout, just different stamped sentiments, and I have two Valentine Cards that were really quick and easy to make. 

Both cards were made with Crumb Cake cardstock for the card base followed by layers of Pretty in Pink and Real Red Designer Series Paper that were from the Filled with Love Paper Bundle (promotion expires today).  If you like this paper you can still purchase it through the promotion today or from the  Brights and Subtles Designer Series Paper Stack in the current Idea Book and Catalog at any time.  I just changed the sentiment on both cards. The Love you Much stamped on the card on the left is from an expired stamp set, the one on the right is from the Love You Much set in the current catalog.  I hold on to my retired stamp sets, especially ones that have cute sayings even though I know I can't demonstrate them at workshops, and you can't order them now, but I'm sure you all have those sets you can't part with and still use for your own personal projects.  Random hearts were punched and placed on both cards.  The hearts on the card on the right were really used to cover some smudged ink, but no one else will know!!

For today's cards I used the following:
Cardstock:  Crumb Cake #120953, Whisper White #100730
Designer Series Paper:  Love Patterns #124156 (promotion ends today), or Brights Patterns Paper Stack #117155 and Subtles Patterns Paper Stack #117152
Ink:  Real Red #103133
Stamp Set:  Love You Much #113756, Teeny Tiny Wishes #
Punches:  Small Heart #117193, Heart to Heart #119881, Word Window #119857, Decorative Label #120907, Small Corner #119871

Tuesday, January 18, 2011

Quick Valentine Treats

Looking for a cute Valentine treat, just fill some bags with your favorite candy, add a cute stamped topper and some pretty ribbon and your done!

I got the bags from a company called Clear Bags and I have used them for several occasions.  For these Valentine treats I punched a Pretty in Pink heart and stamped and punched the Real Red heart.  To add a little more texture and design I also ran the pink heart through my Big Shot using the Perfect Polka Dots embossing folder.  I also added the sentiment to the center of the red heart, and used some retired Pretty in Pink ribbon to dress them up. 

I also like to use Stampin' Up's! cellophane bags available in three different sizes to make treat bags too!  Check back tomorrow to see what I made using the small cellophane bags and cut pieces of Love Impressions Designer Series Paper.

To make today's treat bags I used the following:
Cardstock:  Pretty in Pink #100459, Whisper White #100730
Ink:  Real Red #103133
Stamp Set:  Filled with Love #124380 wood or #124381 clear - Promotion good until 1/24 - after that time set will no longer be available. 
Punches:  Full Heart #119883, 3/4" Oval #120908
Accessories:  Big Shot #113439, Perfect Polka Dot Embossing Folder #117335

Monday, January 17, 2011

Build-a-Roo Valentine

This is my final Stamp-a-Stack Valentine card.  I tried to make a variety with different colors, and wanted to make sure I had some for children too.  The Build-a-Roo Stamp Set gives you many options for a variety of occasions.

For today's card I started with a base of Whisper White cardstock, followed by a matte layer of Basic Gray.  To this layer I added a piece of Love Patterns Designer Series Paper.  I cut a circle with my Big Shot and the large scallop circle on the Scallop Circle #2 Bigz Die.  Before I placed the stamped kangaroo onto the card I cut a slit where his pouch is and placed the punched heart through it, and punched two small holes to make it easy to tie my ribbon and adhere it to the left side.  A quick, cute children's Valentine's Card.

For today's card I used the following:
Cardstock:  Whisper White #100730, Basic Gray #121044, Real Red #119940
Designer Series Paper:  Love Patterns #124156
Ink:  Real Red #103133, Basic Gray #109120
Ribbon:  Real Red 3/8" Taffeta #119763
Stamp Set:  Build-a-Roo #115948, Teeny Tiny Wishes #115370
Punch: Word Window #119857, Heart to Heart #119881
Acccessories:  Big Shot #113439, Scallop Circle #2 Bigz Die #113469

Thursday, January 13, 2011

We're Good Together

Crumb Cake, a little bit of pink, a touch of red, and white - another nice combination of colors for Valentine's Day!

Today's Valentine card starts with a Finial Press Embossed piece of Crumb Cake cardstock for the card base.  The pink layer is from the Love Patterns Designer Series Paper that comes with the Filled with Love Bundle, or can be purchased alone.  To this layer I added a strip of Whisper White cardstock that was punched with the Pinking Hearts Border punch.  To get the ribbon to fold and stay in place I used sticky strip - you just fold and stick!  You can add as many folds as you want, and where you want.  A nice technique to add something different to your project.  The image was stamped on a circle cut with the 2 1/2" circle punch and placed on with dimensionals.

To make today's card I used the following:
Cardstock Crumb Cake #120953, Whisper White #100730,
Designer Series Paper:  Love Patterns #124156 (just the paper) or #124380 wood mount or #124381 clear mount with the bundle - stamp set and paper
Stamp Set:  Love You Much #113756, Filled with Love #124380 wood or #124381 clear
Ink:  Real Red #103133, Crumb Cake #121030
Ribbon:  Whisper White 3/8" Taffeta #109070
Accessories:  Sticky Strip #104294, Dimensionals #104430, Big Shot #113439, Finial Press Embossing Folder #115963
Punches:  Pinking Hearts Border #117649, 2 1/2" Circle #120906

Saturday, January 8, 2011

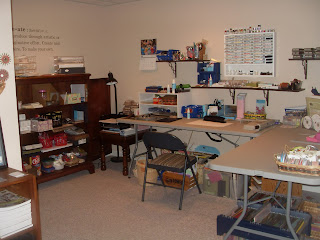
Organized Stamping Studio

Wall of stamps for easy viewing, with project samples below.

Tables for classes and workshops, along with card displays and more project samples.

Big Shot Die Cutting Machine work space.

My stamping corner with everything close by.

Room for organized paper, ink, ribbon, and punches.
Room for catalogs, ribbon share packets, awards, flyers, and small tubs with extra punch and die cut pieces.
One of my New Year's resolutions was to get my Stamping Studio organized and in order.  I really wanted wall space to display my stamp sets so I could see everything I had, and I got this idea of a wall of stamps from my Upline Maureen Stivala who has hers arranged this way.  My wonderful husband used some of his days off over the Christmas holiday to put these up for me, and I spent the last few days taking everything I had and rearranging and reorganizing.  I love the results, and now I have everything out to see and it makes it so easy for me and everyone who comes to my classes and workshops to find what we are looking for.  When I do a stamp class I always have everything set up and precut, but I always give my stampers the choice of changing the sentiment, or adding something extra.  Now they can browse my wall of stamps and have fun personalizing their creations. 

So with the addition of the wall of stamps I now had more space to reorganize all of my other stamping supplies.  The cabinet that was used to hold my stamp sets now is a space for my workshop folders, envelopes, block storage, and so much more. I also organized small storage containers for all of my extra punch and die cut extras.  You know those little extra owl or bird pieces you punch out but don't need right away.  Or extra Build-a-Bear pieces that you don't want to throw away but don't know where to store them.  I bought plastic containers at the dollar store and labeled them and now when I punch out an owl and only use some of the pieces, I place the extras in the marked container.   The Dollar Store is such a great place to get baskets, bins, and containers to help you stay organized without spending a lot of money!

I also like to display samples of projects that can be made with the Big Shot, or gifts that can be made for different holidays, and I have them spread out on little tables that I covered in black tablecloths.  Most of the cabinets and tables I use are mismatched pieces, extras that we no longer needed when my children moved out, or old office supplies my husband now has no use for.  I wanted a nice spacious work area, but didn't want to break the bank on furnishing it, so I just rounded up some old furniture and put it to good use. 

It is such a good feeling to now be really organized, and I think my stamping friends will find it a relaxing place to come and stamp away.  I look forward to sharing it with them at my next Stamp-a-Stack in January.


Tuesday, January 4, 2011

Occasions Mini Catalog Sale Starts Today!

Hopefully you received your own copy of the Occasions Mini Catalog and have had time to make your wish list.  The sale starts today and continues until April 30, 2011.  If you don't have a copy you can download one bygoing to my website and clicking on the catalog link, or just send me an e-mail and I will be happy to send you one.