Showing posts with label Christmas. Show all posts

Sunday, October 17, 2021

Be Jolly - Card #2


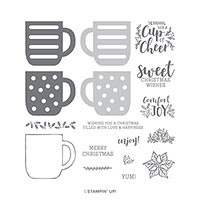
When I make cards for my stamp class I like to show different ways to use each stamp set.  Here is my second card using the "Be Jolly" stamp set.  

I cut a circle through my card front so you could see Santa poking through.  I thought it would be a fun card to send to any one who believes in the magic of Santa.

To make the circle frame on the front I used two circle dies, cutting them together, the smaller one inside the larger one, to make the frame.  A simple card, but it shows the versatility of this cute set.

On the inside of the card I cut another layer of Whisper White Card stock before I stamped and colored my Santa.  When you are using Stampin' Blends to color an image it will bleed through your card stock so make sure you are coloring on a layer.

Stamp Set -  "Be Jolly" - #156370
Designer Series Paper - Painted Christmas - #156292
Layering Circle Dies - #151770

Thursday, October 14, 2021

Be Jolly


The Be Jolly Stamp Set has such cute images that I wanted to use a lot of them on my card, but didn't want it to look too busy.  So I used one of the Picture This Dies and a piece of Heartwarming Hugs Designer Series Paper to create a top layer that the cute images could peek through.

Under the front layer I added another piece of Whisper White Card Stock so I could color using my Stampin' Blends and didn't have to worry about the colors bleeding through my card front.

I added a tag from the Tailor Made Tags Dies to finish my card.

Products Used:
Be Jolly Stamp Set - #156370
Heartwarming Hugs Designer Series Paper - #153492
Tailor Made Tags Dies - #155563
Picture This Dies - #155559


Monday, September 28, 2020

Tree Angle with Gold Cards & Envelopes


The Gold Cards & Envelopes you can purchase from the Holiday Catalog, can help you make really elegant and quick cards.  You get 10 cards and coordinating envelopes, and you can see that I just added a layer of Designer Series Paper and my stamped images to make my Christmas Card.

I used the Tree Angle Stamp Set and coordinating Stitched Triangle Dies that are in the Annual Catalog, Mossy Meadow Ink, and a layer of Heartwarming Hugs Designer Series Paper.  I also added some Gold Glitter Enamel Dots for a bit more embellishment, and my card was finished in no time.

These gold cards and envelopes can be used all year round, so you might want to stock up since they will probably be retiring at the end of this year.

You can see all of these products if you go to my online store at www.eileenlang.stampinup.net or click the shopping card in the upper left hand column of my blog.

Items Used:

Gold Glitter Enamel Dots - #152155
Heartwarming Hugs Designer Series Paper - #153492
Tree Angle Stamp Set - #153442
Stitched Triangle Dies - #152710
Gold Cards & Envelopes - #153532
Mossy Meadow Ink - #147111
Very Vanilla Card Stock - #101650

Saturday, November 23, 2019

Let it Snow


It's that time of the year, when we are thinking of snow, the holidays and lots of fun winter things.  The little snowmen in the Snowman Season Stamp Set are so cute, and they coordinate with the Let It Snow Designer Series Paper to help you with your holiday cards and projects.

I used a small layer of the Designer Series Paper to my card base, along with a piece of Real Red 1" Ruched Ribbon.  My snowman was stamped in Memento Black ink, colored in a few places with markers and cut out with a Circle Stitched Shape and placed onto my card.  I also added some Red Rhinestones for a bit more dimension.

Note:  The stamp set also coordinates with the Snowman Builder Punch and can be purchased together in a bundle to save you 10%.

Wednesday, November 13, 2019

Pillow Box Christmas Treat


If you don't have a lot of time to prepare small holiday gifts, you can use the Kraft Pillow Boxes that Stampin' Up! carries in the annual catalog.  I filled these with holiday candy, added a strand of leaf ribbon, and tied the box closed with Real Real Ruched Ribbon from the Holiday Catalog.

I added my sentiment, and punched it out with the Pretty Label Punch and tied it onto my red ribbon with some Linen Thread.  

These went together really quickly and are nice for co-workers, teachers, and small gifts for friends.

The following were used:

Thursday, October 3, 2019

Snowfall Accents Puff Paint

The Snowfall Accents Puff Paint adds so much texture to your project and is easy to use.  You can watch the video below, made by Stampin' Up! to see how it works.  I used it to decorate Wood Chip Ornaments that are pictured below the video, and you can see that is really does "Puff" up when heated.


To make the ornaments, I stamped my images using Staz-On Ink, and then colored them with my Stampin' Write Markers.  I added the Puff Paint and used my Heat Tool to make it puff up.  So easy to use, and I really like the texture they add to the ornaments. 


Wednesday, September 18, 2019

Wood Chip Ornaments


I have been making Wood Chip Ornaments for gifts and also for craft fairs, and they are really easy to make,

I purchased the wood chips already cut, and using Staz-On Ink and my Stampin' Up! stamp sets I was able to create the ornaments in no time.  I just added additional ribbon, and for some used jingle bells and pine cone trinkets to add a little extra embellishment.    

The new Stampin' Up! Shimmery Crystal Effects and Ice Stampin' Glitter added shine to my house ornament, and I will be trying the Snowfall Accents Puff Paint on the new ones I will be making.


Friday, September 13, 2019

Mini Curvy Keepsake Box


One of my favorite things in the Holiday Catalog is the Mini Curvy Keepsake Box Die.  It coordinates with the tiny Keepsakes Stamp Set and you can purchase them together in a bundle to save 10%.

I do a lot of fall craft fairs and when I saw this die I knew it would make cute holiday favors.  Since it is small, you only need one cut on a 6 x 6 piece of paper and your box is ready to be assembled.   No adhesive needed to put it together.  Just fill with your favorite treat, add a tag and you are done.

I put one Lindor Chocolate Truffle in each box and I was able to cut out 108 of them in less than an hour.


The following were used:

Tuesday, August 27, 2019

Winter Woods


Another card I made using holiday products in the Annual Catalog contains stamps from both the Dashing Deer and Winter Woods Stamp Sets.  Both of these are available now if you are having a hard time waiting until September 4th to order new holiday products.


I used my Stamparatus to line up the trees in the background.  The Stamparatus is a great tool for making it easy to quickly stamp repeated images.  I also cut a small layer of Whisper White Card Stock and added it to the bottom of the card to make it look like snow, and then added my cut tree and deer. Some Red Rhinestones were added for tree decorations and Garden Green ink was daubed onto my sentiment for a bit more color.


The following were used: