Thursday, March 29, 2012

Daisies for mom

I am already working on Mother's Day projects for April's stamp class.  Hard to believe that it is almost that time.  I also plan on making matching purses using the new Petite Purse Die that I is one of the sneak peek items you can order in April.

My card base is Whisper White cardstock, that is layered with a piece of Sweet Shop Designer Series Paper.  I cut two Daisies with my Big Shot using Daffodil Delight and Wisteria Wonder cardstock.  I used part of each to make one large flower, and saved the left over pieces for another project.  I then embossed all of these layers with the Finial Press embossing folder.  My sentiment is from the Delighftul Dozen stamp set, and I stamped it on with Wisteria Wonder ink, punched it out, and sponged some additional Wistria Wonder ink around the edges. 

The following were used:
Cardstock:  Whisper White #100730, Wisteria Wonder #122922, Daffodil Delight 3119683
Ink:  Wisteria Wonder #122936
Stamp Set:  Delightful Dozen #122650 wood - #122652 clear
Accessories:  Big Shot #113439, Flower, Daisies #2 Bigz Die #114520, Finial Press Embossing Folder #115963, Stamping Sponges #101610
Adhesive:  Dimensionals #104430, Snail #104332
Punch:  Scallop Oval #119856

Wednesday, March 28, 2012

A Woman is Like a Tea Bag

Holder and Tea Bag Insert

Inside Insert

Opened Tea Bag Insert
I have had request to make these tea bag holders for Christmas gifts, and recently was asked to make them again, using Spring/Summer colors.  I changed the colors and the saying but the dimenions are the same as the one I posted on 11/5/10.  If you would like to make some yourself, click on the link "Tea Bag Treats" listed under my labels in the left hand column, and you will find the dimensions.

The holder was made by using my Big Shot and cutting two Scallop Envelopes, and attaching them together.  Concord Crush 1/2" Stitched Poly Ribbon and a In Color Designer Printed Brad not only decorated it, but also held the saying in place.  The tea bag insert was made using Blushing Bride cardstock, and added layers of Concord Crush and Whisper White.  The Triple Treat Flower stamp was used to decorate the front, and the cup stamped on the inside is from Itty Bitty Bits.  An additional strip of Concord Crush was punched with the Eyelet Border punch to decorate the inside. Before the front layer was attached, I tied some Pink Pirouette 3/8" Taffeta Ribbon around it.

The following were used:
Cardstock:  Blushing Bride #119796, Concord Crush #119792, Whisper White #100730
Stamp Sets:  Triple Treat Flower #122909,  Itty Bitty Bits #117056 wood - #120060 clear
Ink:  Concord Crush #119785
Punch:  Eyelet Border #119853
Accessories:  Big Shot #113439, Scallop Envelope Bigz Die #113462
Embellishment:  In Color Designer Printed Brad #122940
Ribbon:  Concord Crush 1/2" Stitched Poly #119266, Pink Pirouette 3/8" Taffeta #122981

Tuesday, March 27, 2012

To celebrate the upcoming wedding of two very special people, I am in the process of designing shower invitations.   This is a layout I have used on greeting cards, but with the addition of the Oval Designer Frame I thought it would make a nice invitation.

My card base is Very Vanilla cardstock, followed by layers of Basic Black, as well as First Edition Specialty and some retired Designer Series Paper I purchased on the Clearance Rack.  The frame was cut using the Big Shot, and a few tears in the paper added a different look.  The "love" sentiment was tied onto the Very Vanilla 1/2" Seam Binding using Linen Thread. 

I made several designs for the shower, and while we liked this one, it is not the final one chosen.  As we get closer to the shower and the final invitations are mailed I will post a picture of the one selected. 

The following were used:
Cardstock:  Very Vanilla #101650, Basic Black #121045
Designer Series Paper:  First Edition #121878 and the black DSP is retired and I purchased it awhile ago on the Clearance Rack
Stamp Sets:  On Your Birthday #111664, Tiny Tags #118091 wood or #118592 clear
Ribbon:  Very Vanilla 1/2" Seam Binding #120999, Linen Thread #104199
Tools:  Big Shot #113439, Designer Frames Embossing Folder #123130, Crop-a-Dile #108362
Punch:  Jewelry Tag #117190

Monday, March 26, 2012

Language of Friendship

If you like the stamp set that was used for today's card you can still get it for FREE during Sale-a-bation.  But, don't wait too long, because Sale-a-bration ends March 31st.   It is also one of the sets available for sale in the Idea Book and Catalog, but getting it for FREE is so much better.

My card base is Pear Pizzazz cardstock, followed by a layer of Very Vanilla that was embossed with the Framed Tulips Embossing Folder, and also cut with one of the Framelits Labels Collections Dies.  Behind this layer is a piece of Twitterpated Designer Series Paper.  The stamped images were inked with Baja Breee ink, punched out and placed on with dimensionals.   I also sponged some Baja Breeze ink  around the embossed tulips.    I added two additional punched flowers using an Itty Bitty Shapes Punch and Pear Pizzazz cardstock, and embellished them with pearls.

The following were used:
Cardstock:  Pear Pizzazz #119795, Very Vanilla #101650
Designer Series Paper:  Twitterpated #125406 (Occasions Mini)
Ink:  Baja Breeze #111833
Stamp Sets:  Language of Friendship #127721 wood, #127722 clear (if ordering for a Sale-a-bration promotion) or #122750 wood, #122752 clear (from the Idea Book & Catalog), Petite Pairs #122495 wood, #122497 clear
Punches:  Bird Builder #117191, Boho  Blossoms #119858, Itty Bitty Shapes Punch Pack #118309, Large Oval #119855
Accessories:  Big Shot #113439, Framed Tulips Embossing Folder #121809, Framelits Labels Collection #125598, Stamping Sponge #101610
Adhesive:  Dimensionals #104430, Snail #104332
Embellishment:  Basic Pearls #119247

Tuesday, March 20, 2012

More card class make overs

Once again, a card that was prepared for my card class was easily changed to make a birthday card.  By just adding a new stamp, some embossing, and a punched layer, and a whole new card was created.  That is the great thing with a good card design.  You can change it to fit your needs.  Thank you to all of the talented Stampin' Up! demonstrators who share their ideas and help me come up great cards for my classes.

Both cards started with a card base of Blushing Bride cardstock, and an added layer of Twitterpated Designer Series Paper.  The center of the card was created by cutting Whisper White cardstock with the Labels Framelits Die.  The smaller Framelit was used for the stamped image, and the larger Framelit was sponged with Baja Breeze ink to help it stand out.   Blushing Bride 3/8" Pleated Satin Ribbon was used on the bunny card, and a punched piece of Baja Breeze cardstock was substituted on the birthday card.  The birthday card was also embossed before the Framelits were placed on, adding more texture and dimension.

The lady who created the second card is Stella.  She is new to my classes, and this was just her second time joining us.  It was fun helping her create the birthday card she needed, and she didn't mind using a retired stamp to do it.  She said it was just what she was looking for.

The following were used:
Cardstock:  Blushing Bride #119796, Whisper White #100730, Baja Breeze #111352
Designer Series Paper:  Twitterpated #125406
Stamp Sets:  Everybunny #122705 wood or #122707, Teeny Tiny Wishes #115370, and two retired sets
Ink:  Soft Suede #115657, Baja Breeze #111833     Markers:  Blushing Bride #119801 (In-Color Pack), Crumb Cake #121030
Accessories:  Big Shot #113439, Labels Framelits Die #125598, Finial Press Embossing Folder #115963, Stamping Sponges #101610
Punches:  Word Window #119857, Scallop Trim Border #118402
Ribbon:  Blushing Bride 3/8" Pleated Satin #125570 (Occasions Mini)

Monday, March 19, 2012

Joy Fold Get Well Card

Folded Card

Layer your embellishment to the left so card opens easily. 

Inside of card

This is one of the cards taught at my last stamp class.  They are easy to make, and once you have the dimensions, with the great coordination of Stampin' Up! Designer Series Paper and cardstock, the possibilities for creativity are endess.  I'm not going to go into all of the deatils on how to make the Joy Fold Card, but if you click on the label in the left hand column titled Joy Fold you can get all of the dimensions that I previously posted.

The following were used:
Cardstock:  Calypso Coral #122925, Whisper White #100730
Designer Series Paper:  Everyday Enchantment #126154 (Sale-a-bration)
Stamp Sets:  Triple Treat Flower #122909, Delightful Dozen #122650 wood or #122652 clear
Ink:  Calypso Coral #122939
Punches:  Fancy Flower #118073, 1" Circle #119868, 1 1/4" Circle 119861
Embellishment:  Bitty Buttons #118761


Friday, March 16, 2012

Stamp Class Card Make-overs

Original Card prepared for class

Nancy's version using different Designer Series Paper and an extra ribbon

Another great card with different DSP, ribbon and the addition of a butterfly
If the top card looks familiar it is because I already posted it earlier this week.  It is one of the cards I prepared for my monthly stamp class.  One of my talented stampers liked the layout but wasn't crazy about the blue in the Designer Series Paper.  I gave her a different sheet of Designer Series Paper from the same pack and she came up with two totally different cards, all the while keeping a very similar layout.  I love this group of talented ladies.  We all get such great ideas from each other, and I am glad to see them expressing their creativity.  Thanks Nancy DeWitt for your two cards that I am posting today.

The following were used:
Cardstock:  Whisper White #100730, Daffodil Delight #119683
Designer Series Paper:  Twitterpated #125406 (Occasions Mini)
Ink:  Island Indigo #122937, Pear Pizzazz #119784   Marker:  Daffodil Delight #119677
Stamp Set:  Apothecary Art #125525 wood or #122527 clear (Occasions Mini)
Ribbon:  Daffodil Delight 1 1/4" Striped Grosgrain #119770, Daffodil Delight 1/4" Grosgrain #120928, Old Olive 5/8" Satin #117292
Accessories:  Big Shot #113439, Labels Collection Framelits #125598, Beautiful Wings Embosslits #118138


Thursday, March 15, 2012

He Is Risen

The Frame Oval Scallop paired with an Ovals Original Die shape are the centerpiece for my card. 

My card base is Very Vanilla cardstock with an added layer of Everyday Enchantment Designer Series Paper.  The larger oval is from the Frame Oval Scallop Bigz Die, and the second oval is the large oval from the Ovals Original Die.  To save paper, after I cut the frame oval, I had the large oval that was leftover.  I used that to cut the smaller oval.  I am always looking for ways to save paper.  The flower is from He Is Risen, a great set for your religious Easter cards.  I stamped it in Lucky Limeade ink, and added a bit of color by blending in some Pool Party ink using the Blender Pens.

The following were used:
Cardstock:  Very Vanilla #101650
Designer Series Paper:  Everyday Enchantment #126154 (Sale-a-bration)
Stamp Sets:  He Is Risen #121919 wood or #121988 clear, Teeny Tiny Wishes #115350
Ink:  Lucky Limeade #122935, Pool Party #122938
Accessories:  Big Shot #113439, Frame, Oval Scallop #114521, Ovals #114525, Blender Pens #102845

Wednesday, March 14, 2012

Posy Punch for Easter or any occasion

Well, I had to play with my new diagonal scoring tool, so I used it to help me score and then cut even triangles for my card layer.  Since my layer measures 4" square, I just placed it on the Diagonal Scoring Tool and scored from the first diagonal line up to 2".  I turned the square until I had all four lines scored and then just cut away.  I now also have two extra triangles for my next project.

My card base is Baja Breeze cardstock followed by a layer of Twitterpated Designer Series Paper that measures 5 1/4" x 4" and then another piece of Twitterpated DSP that was used to create my triangles.  I stamped my Posy Punch flower in Baja Breeze ink and punched it out with the Fancy Flower Punch before layering it onto my Whisper White, Baja Breeze, and Pear Pizzazz cardstock.  A Twitterpated Designer Button was added to the center of the flower for embellishment.  My sentiment made this an Easter card, but this card could be used for so much more.   I will probably make a few more and just wait to put on the appropriate sentiment when I need another card to send.

If you want to order your own Simply Scored Diagonal Plate you can go to my online store and get yours today.  The plate is #125586 and sells for $11.95.  It is great for making your own custom envelopes too.  The plate fits on top of the Simply Scored Scoring Tool that is in the Occasions Mini Catalog, and the two are used together.

The following were used:
Cardstock:  Baja Breeze #111352, Pear Pizzazz #119795, Whisper White #100730
Designer Series Paper:  Twitterpated #125406 (Occasions Mini)
Ink:  Baja Breeze #111833, Pear Pizzazz #119784
Stamp Sets:  Posy Punch #122480 wood or #122482 clear, Delightful Dozen #122650 wood or #122652 clear
Punches: Fancy Flower #118073, Modern Label #119849
Accessories:  Simply Scored Scoring Tool #122334, Simply Scored Diagonal Plate #125586, Dimensionals #104430
Embellishment:  Twitterpated Designer Buttons #125579 (Occasions Mini)

Tuesday, March 13, 2012

Twitterpated Easter Card

These are not the traditional colors I use for most of my Easter cards, but I like trying different combinations.  What is nice about this layout is you just have to change the sentiment stamped in the middle of the Apothecary Art stamp and you have a card for so many occasions.

My card base of Whisper White cardstock was layered with a piece of Daffodil Delight and a piece of Twitterpated Designer Series Paper.  I added some 1 1/4" Striped Grosgrain Daffodil Delight ribbon to offset all of the flowers in the paper and the stamp.  I stamped my image first using Island Indigo Ink, and then cut it out with a Labels Framelits.  This was layered onto the whole card using dimensionals.

One of the reasons I love the Framlit Dies is that you can stamp your image first, and then find the appropriate size  framelit to cut and accent it. 

The following were used:
Cardstock:  Whisper White #100730, Daffodil Delight #119683
Designer Series Paper:  Twitterpated #125406 (Occasions Mini)
Ink:  Island Indigo #122937
Stamp Set:  Apothecary Art #125525 wood or #124427 clear (Occasions Mini) *The Easter Wishes sentiment is from a retired set
Ribbon:  Daffodil Delight 1 1/4" Striped Grosgrain #1119770
Accessories:  Big Shot #113439, Labels Framelit Die #125598
Adhesive:  Dimensionals #104420, Snail #104332


Monday, March 12, 2012

Simply Scored Background

I wanted to create a tile background so I used my Simply Scored Scoring Tool and scored in 1" increments.  To further accent the background I ran ink over the scored piece using my Brayer.  I like the way the ink highlighted the lines, and added color to my Whisper White cardstock.

My card base is Tangerine Tango, and is layered with a piece of Regal Rose and the Whisper White cardstock that was scored and inked with the brayer.  I stamped two flowers from the Mixed Bunch Stamp Set and punched them out with the Blossom punch.  I added a 5/16" Neutral brad to the center of each flower and also added a strip of Melon Mambo 1/2" Scallop Dots Ribbon, along with my stamped and punched sentiment. 

So I could score at 1" increments, my layer of Whisper White cardstock was cut to measure 5" x 4".  This made it easy for me to score and I like the even lines.

The following were used:
Cardstock:  Tangerine Tango #111349, Regal Rose #105130, Whisper White #100730
Stamp Sets:  Mixed Bunch #125535 wood or #15537 clear (Occasions Mini), Friendly Phrases #126149 wood or #126151 clear
Ink:  Tangerine Tango #111834, Regal Rose #105211
Punches:  Blossom #125603 (Occasions Mini), Scallop Oval #119856
Ribbon:  Melon Mambo 1/2" Scallop Dots #122985
Embellishment:  5/16" Neutral Brad #112534
Accessories:  Simply Scored Scoring Tool #122334, Brayer #102395

Friday, March 9, 2012

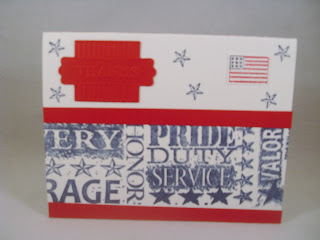
Thank you for our troops

I will be helping a wonderful 501(c) 3 Non-Profit Organizaton called Humble Hearts For Hope, Inc. at their first annual youth camp in May.  This camp is open to children in 6th to 11th grade and is a great service opportunity for those attending to help assist miliitary deployed soldiers.  The activity I will be involved in is helping the children make thank you and thinking of you cards for the troops, as well as birthday cards they can use to send home to their loved ones, and post cards where the children will write their own personal message. 

One of the cards I designed for the children to make is the above thank you card.  It uses the Hero Jumbo Wheel for the message at the bottom, as well as the flag and stars from the Service & Sacrifice Stamp Set.  The red embossed Thanks is from a retired Embosslits Die that unfortunately does not show up in the picture as well as it does on the actual card.  I added some additional strips of Real Red cardstock to highlight the words of the Hero Wheel. 

I am sure the troops will really appreciate these cards from the children, and I am really honored to be helping such a good cause.  If you would like to learn more about this organization you can go to their website at www.hhh.org and read about all of the wonderful things they are doing for our troops.

The following supplies were used:
Cardstock:  Whisper White #100730, Real Red #102482
Stamp Set:  Service & Sacrifice #115992
Jumbo Wheel:  Hero #116229
Ink:  Night of Navy #102977   Markers:  Night of Navy #100069, Real Red #100052 (for the flag)

Thursday, March 8, 2012

Hair Accessories

Still making items for my spring craft fairs, and one of my favorite things to make is a variety of hair accessories.  People are surprised to see that Stampin' Up! is so much more than card making or scrapbooking. 

On the wider headbands I cut craft foam which was purchased at a local craft store, with my Big Shot and used the small flower in the Flower Folds Bigz XL Die, and the largest daisy in the Daisies #2 Bigz Die.  I attached a retired SU button to the center and kept everything together using a glue gun.

The thinner headband uses craft foam and Stampin' Up! fabric both cut with the small circle in the Scallop Circle #2 Bigz Die, and a Neutral Button for the center.

The hair tie embellishment is the smallest Daisy from Daisies #2 Bigz Die, and fabric and a medium sized flower from the Flower Folds Die dressed up the hair clip. 

I made baskets of each type of hair accessory using a variety of Stampin' Up! fabrics and buttons, and they will surely bring color to my table.

The following Stampin' Up! products were used:
Accessories:  Big Shot #113439, Flower Folds Bigz XL Die #115970, Daisies #2 Bigz Die #114520, Scallop Circle #2 Bigz Die #112469
Fabric:  Spice Cake #124066 (carryover item from the Holiday Mini Catalog), Sprintgime Vintage #121817
Embellishments:  Neutral Designer Buttons #119743


Tuesday, March 6, 2012

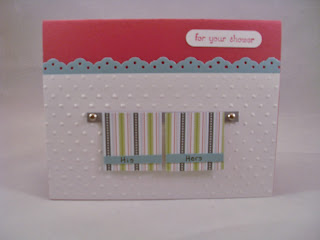
His and Hers

His and Hers, a different way to make a bridal shower card even if you don't have any wedding/bridal stamp sets.

My card base is Riding Hood Red cardstock, that was layered with an embossed piece of Whisper White, and a piece of Baja Breeze that was punched with the Eyelet Border Punch.  I made the towels by punching two pieces of Twitterpated Designer Series Paper with the 1 3/8" Square Punch.  The towel bar was created by cutting a strip of Brushed Silver cardstock, and placing it on the layers using a Silver Brad.  The His and Hers was hand written on small strips of Baja Breeze cardstock using a Stampin' Write Basic Black Journaler, and the towels were placed on the card using dimensionals.

The only Stamp Set I needed to use was Teeny Tiny Wishes for my sentiment.  It is one of those must have stamp sets for me.  It comes with 26 sentiments, giving you so many options, and works great with the Word Window punch too.

The following were used:
Cardstock:  Riding Hood Red #111348, Baja Breeze #111352, Whisper White #100730, Brushed Silver #10712
Designer Series Paper:  Twitterpated #125406
Stamp Set:  Teeny Tiny Wishes #115370
Ink:  Riding Hood Red #111836
Punches:  Word Window #119857, 1 3/8" Square #119877, Eyelet Border #119853
Accessories:  Big Shot #113439, Perfect Polka Dots Embossing Folder #117335
Embellishments:  Silver Brads #104336
Coloring Tools:  Stampin' Write Journaler #105394

Monday, March 5, 2012

A few more Easter treat ideas

Mini Milk Carton and Pillow Box Treats

Petal Cone Die Carrot

Top of carrot
This weekend is my first craft fair of the year and since it is so close to Easter, most of the products I will be featuring will be for the holiday.  I thought I would share a few of them with you.

I used the Mini Milk Carton Bigz L Die to make a colorful display of Easter treat boxes.  My stamped image is from the Everybunny stamp set, and I used markers to color it in.  I punched it out with the Extra Large Oval punch and placed it on the carton using dimensionals.  A Mini Library Clip was used to keep it closed, and added the Happy Easter that was punched with the Word Window punch.  I made over 24 of these in a variety of colors and make a really nice display.

Next I used the Pillow Box Bigz Die, which was cut using a variety of Designer Series Paper.   Window Sheets were used so you could see what was inside, and I used my retired oval punch to create the opening.  Coordinating ribbons were tied around for added embellishment, as well as my Happy Easter sentiment.  I made a variety of these and filled some with Reeses Peanut Butter Eggs or Hershey Milk Chocolate Eggs.   I also used a lot of my Designer Series Paper that I purchased from the Clearance Rack.  I always make sure to check it out often, because I never know when a good bargain will appear. 

The large carrot was made using the Petal Cone Bigz L Die, and I filled 3" x 5" cellophane bags with jelly beans and placed them inside.  To secure the top, I punched Wild Wasabi cardstock with the 2 3/8" Scallop Circle, and punched holes in the top of the two flaps on the top of the cone as well as on the edges of the scallop circle.  I then tied it closed with Pumpkin Pie 1 1/4" Striped Grosgrain Ribbon (retired).  This way they are really easy to open without having to rip apart the cone, and they also are really secured. 

Not listing the ribbon, cardstock and DSP - the following were used:
Accessories:  Big Shot #113439, Mini Milk Carton Bigz L Die #117310, Pillow Box Bigz Die #112466, Petal Cone Bigz L Die #121810, Window Sheets #114323, Crop-a-Dile #108362, 3" x 5" Cellophane Bags #103104
Punches:  Extra Large Oval #119859, Word Window #11957, Modern Label #119849, 2 3/8" Scallop Circle #118874
Stamp Sets:  Everybunny #122705 wood or #122707 clear, Teeny Tiny Wishes #115370


Thursday, March 1, 2012

The Simply Scored Diagonal Plate is here!


Stampin' Up's! Simply Scored Diagonal Plate has arrived.   To see more about it click here.
I just received mine and can't wait to try it out. I will post completed projects as soon as I have them finished. 

To order just go to my on-line store. 


Item
Description
Price
125586
Simply Scored Diagonal Plate
$11.95

Product Features
  • Sits on top of the Simply Scored base
  • Held securely in place by rubber pads on back of the plate
  • Has etched grooves every 1/8"
  • Can score any size card stock up to 12" x 12"
  • Includes instructions for creating common envelope sizes
  • Coordinating products included
    • Simply Scored (item 122334)
    • Simply Scored Place Markers (item 125625)
    • Simply Scored Stylus (item 125624)
    • Bone Folder (item 102300)

Top Note Die Easter Bunny Peeps

One of my favorite things to make at Easter is the Top Note Die Easter Bunny Peeps.  I like trying to coordinate the cardstock color with the peeps.  They really make for a colorful dispay at my craft fairs, and my grandchildren really love getting them in their Easter baskets.

I cut the cardstock using my Big Shot and the Top Note Bigz Die.  I folded the die in half and then using punches I made my bunny face.  I placed the peeps in small cellophane bags, and tied everything together with 1/4" grosgrain ribbon.  I added the whiskers and eyes with either a uni-ball Signo Gel Pen in white or a Stampin' Write Journaler in black.  I just found some purple peeps so I'm off to make some in Wisteria Wonder.  Oh, I love the colors of Easter!

The following were used:
Cardstock:  Pretty in Pink #100459, Tempting Turquoise #102067, Whisper White #100730
Stamp Set:  Teeny Tiny Wishes #115370
Ink:  Pretty in Pink #101301, Tempting Turquoise #100814
Punches:  Word Window #119857, Extra Large Oval #119859, Large Oval #119855, 3/4" Circle #119873, 1" Circle #119868
Ribbon:  Pretty in Pink 1/4" Grosgrain #109032, Tempting Turquoise 1/4" Grosgrain #124323
Accessories:  Big Shot #113439, Top Note Bigz Die #113463, Crop-a-Dile #108362, 3" X 5" Cellophane Bags #103104
Coloring Tools:  uni-ball Signo Gel Pen #105021, Stampin'  Writ urnaler #105394